Discover the art of no-bake confections with this comprehensive collection of seven exceptional ball-style treats that require minimal equipment and deliver maximum flavor. From crunchy cereal-studded creations to tropical fruit-infused delights, these recipes transform simple ingredients into elegant, bite-sized confections perfect for any occasion. Each recipe has been carefully developed to provide foolproof results while offering opportunities for creative customization.
Why You’ll Love This Recipe Collection
No Baking Required – Every single recipe in this collection eliminates oven use entirely, making them perfect for hot weather, small kitchens, or situations where oven space is limited by other dishes.
Simple Ingredient Lists – Most recipes require fewer than ten ingredients, with many utilizing pantry staples and readily available items that don’t demand specialty store visits or expensive purchases.
Make-Ahead Excellence – All seven varieties can be prepared days or even weeks in advance and stored properly, making them ideal for holiday preparation, party planning, or creating homemade gift assortments.
Impressive Presentation – Despite their simple preparation methods, these treats deliver bakery-quality visual appeal through chocolate coatings, colorful decorations, and professional-looking finishes that impress guests.
Texture Variety – The collection offers diverse textural experiences from crunchy Rice Krispies to smooth cream cheese bases, ensuring you’ll find options that satisfy different preferences and complement various serving occasions.
Freezer-Friendly Convenience – Nearly all recipes freeze beautifully for extended storage, allowing you to prepare large batches during free time and have homemade treats ready for spontaneous entertaining or gift-giving needs.
Ingredients You’ll Need
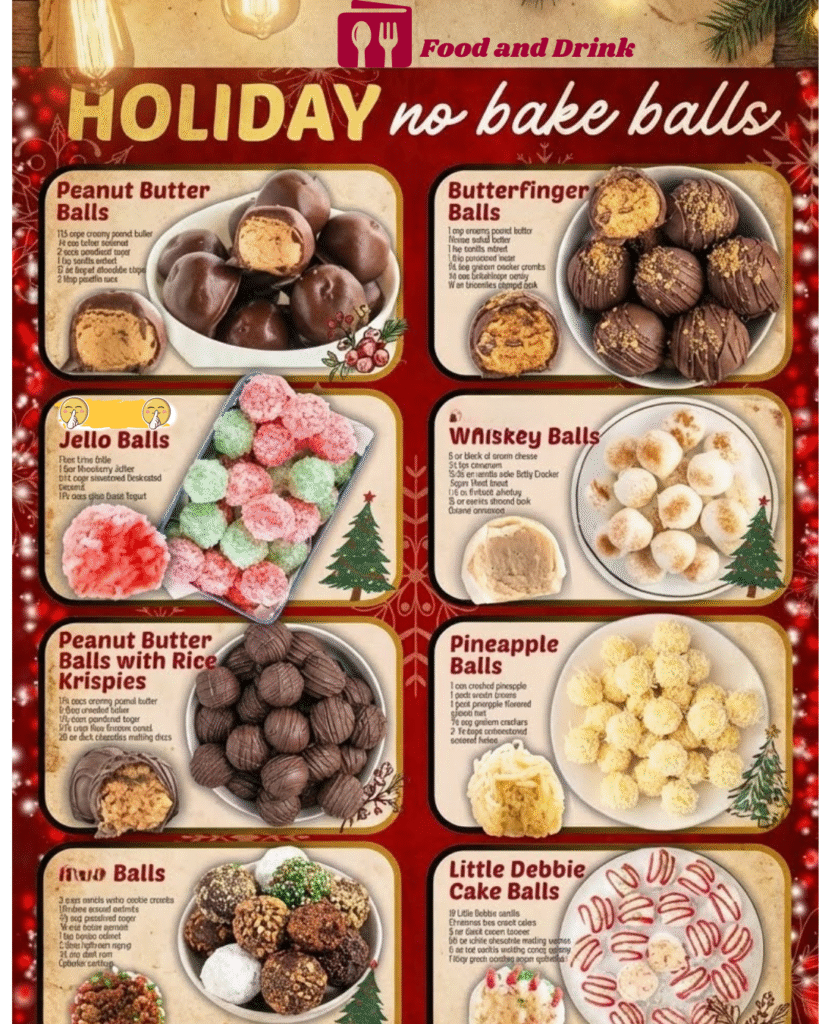
For Rice Krispies Peanut Butter Balls
- 1½ cups creamy peanut butter (Peter Pan brand) – provides the binding base and primary flavor while contributing protein and richness
- 5 tablespoons unsalted butter, melted and cooled – adds smoothness and helps create proper consistency for rolling
- 1½ cups powdered sugar – sweetens the mixture while contributing to the firm texture that holds shape
- 2½ cups Rice Krispies cereal, lightly crushed – delivers signature crunch and textural contrast against the creamy peanut butter
- 20 ounces dark chocolate melting discs – creates professional coating that hardens quickly without requiring tempering
For Snack Cake Balls
- 10 vanilla snack cakes, unwrapped from 2 boxes – provide flavored cake base that eliminates need for baking from scratch
- 8 ounce block cream cheese, softened to room temperature – binds the crumbled cake pieces and adds richness
- 20 ounces white chocolate melting wafers (Ghirardelli brand) – creates smooth outer coating
- 6 ounces vanilla flavored melting candy wafers – provides decorative drizzle element
- 1 tablespoon sanding sugar sprinkles – adds sparkle and textural interest to finished treats
For Vanilla Wafer Cookie Balls
- 3 cups finely ground vanilla wafer cookie crumbs from 11-ounce box – forms the foundational structure
- 1½ cups finely ground walnuts from 6-ounce bag – adds nutty flavor and textural complexity
- ⅔ cup powdered sugar – sweetens and helps bind ingredients
- ¼ cup Dutch-process 100% cocoa powder (Ghirardelli brand) – contributes chocolate flavor and darker color
- 1 teaspoon vanilla extract – enhances overall flavor profile
- 3 tablespoons light corn syrup – provides binding moisture and slight sweetness
- Various optional coatings: nonpareils sprinkles, chocolate jimmies, finely chopped walnuts, candy bar crumbs, powdered sugar, cocoa powder – allow for customization and visual variety
For Chocolate Peanut Butter Balls
- 1½ cups chunky or creamy peanut butter – delivers primary flavor and creamy texture
- ½ cup butter, softened – contributes richness and smooth consistency
- 2 cups powdered sugar – sweetens and creates firm, rollable texture
- 1 teaspoon vanilla extract – enhances flavor complexity
- 12 oz bag chocolate chips – provides coating material
- 2 tablespoons paraffin wax, grated (or substitute with Candy Melts) – helps chocolate harden and creates glossy finish
- Sprinkles, optional – adds decorative element
For Butterfinger Balls
- 1 cup creamy peanut butter – forms creamy base
- ¼ cup salted butter, softened – adds richness
- 1 teaspoon pure vanilla extract – enhances flavor
- 1 cup powdered sugar – sweetens and firms mixture
- ¾ cup graham cracker crumbs – provides texture and helps bind
- ½ cup crushed Butterfinger candy (6 fun-size bars) plus 1-2 extra for garnish – delivers signature candy bar flavor
- 10 ounces chocolate flavored almond bark, divided (8 ounces and 2 ounces) – creates coating and decorative drizzle
For Gelatin Coconut Balls
- 1 box Lime Jello (3 oz) – provides one flavor and color option
- 1 box Strawberry Jello (3 oz) – offers contrasting flavor and color
- 6½ cups sweetened desiccated coconut, divided – creates structure and exterior coating
- 1½ cups plain Greek yogurt, divided – binds ingredients and adds tangy contrast
For Pineapple Coconut Balls
- 20 ounce can crushed pineapple, very well drained – provides tropical fruit flavor
- 8 ounce package cream cheese, softened – creates smooth, rich base
- 3 ounce package pineapple flavored gelatin mix (Jell-O brand) – intensifies fruit flavor
- ¾ cup finely crushed graham crackers – adds texture and helps absorb moisture
- 2¼ cups unsweetened coconut flakes – forms exterior coating
Step-by-Step Instructions
Rice Krispies Peanut Butter Balls
Prepare Workspace Line 2 large rimmed baking trays with parchment paper or silicone baking mats and set aside for later use.
Melt Peanut Butter Heat the creamy peanut butter in a small, microwave-safe bowl for 30 seconds or just until melted and easy to stir, which improves incorporation with other ingredients.
Mix Base Ingredients In a large mixing bowl, combine the melted peanut butter, melted and cooled butter, and powdered sugar, stirring vigorously until the mixture becomes well combined and smooth without any sugar lumps.
Add Cereal Gently fold in the lightly crushed Rice Krispies cereal using a rubber spatula, working carefully until all cereal pieces are coated with the peanut butter mixture without crushing them further.
Portion the Mixture Using a 1-inch cookie scoop, portion out 28 level balls and place them onto one of the prepared baking trays, repeating until all the mixture has been used.
Chill and Shape Place the baking tray into the refrigerator to chill the scoops for up to 1 hour or until firm, then lightly roll each ball in the palms of your hands to smooth the outer layer for better appearance when dipped.
Melt Chocolate Coating In a microwave-safe bowl, add the dark chocolate melting discs and heat on high for 1 minute, then stir and continue heating in 30-second intervals, stirring between each one, until the chocolate is completely melted and smooth.
Dip in Chocolate Using a fork, carefully dip each chilled peanut butter ball into the melted dark chocolate and roll to completely cover, then lift out and gently tap the fork on the bowl’s side to allow excess chocolate to drip back.
Transfer and Decorate Using a second fork or toothpick, carefully slide each chocolate-coated ball onto the second prepared baking tray, then optionally create decorative drizzle patterns on tops using remaining melted chocolate once the dipped balls begin hardening.
Final Chill Place the tray of chocolate-covered balls back into the refrigerator for 15 minutes to set and harden the coating completely before transferring to a serving platter.
Snack Cake Balls
Prepare Baking Sheets Line two large baking sheets with parchment paper or silicone mats and set aside for assembly.
Beat Cream Cheese Add softened cream cheese to a large mixing bowl and beat on medium speed using a handheld mixer for 1-2 minutes until fluffy and completely smooth without lumps.
Combine with Cakes Break the vanilla snack cakes into smaller pieces and add to the beaten cream cheese bowl, then mix on low speed just until fully combined, accepting that some small coating pieces may remain.
Form Balls Using a small cookie scoop, portion out 1 tablespoon-sized amounts of the mixture, place in your palm, and gently roll to form smooth balls, then place on the prepared baking sheet.
Freeze for Coating Freeze the formed cake balls for 30-45 minutes until completely solid, which makes coating them in melted chocolate significantly easier and prevents them from falling apart.
Melt White Chocolate Melt the white chocolate wafers in a medium bowl according to package directions, stirring to achieve smooth consistency.
Prepare Decorative Coating In a separate small bowl, melt the vanilla flavored candy wafers according to package directions until smooth, then transfer to a small piping bag with the tip cut off.
Coat and Decorate Place a single cake ball into melted white chocolate to coat all sides, lift out with a fork while tapping to remove excess, then immediately pipe a decorative pattern across the top and sprinkle with sanding sugar before the coating sets.
Allow to Set Let the coated balls rest for 15-20 minutes until the white chocolate coating is completely firm before plating and serving.
Vanilla Wafer Cookie Balls
Prepare Workspace Line a large rimmed baking sheet with parchment paper or a silicone mat and set aside.
Process Cookies In a food processor bowl, pulse the vanilla wafer cookies for 30 seconds until they form very fine crumbs, then pour into a large mixing bowl.
Grind Walnuts Add walnuts to the same food processor bowl (no need to clean it) and pulse for 30 seconds until very finely ground, then pour into the bowl with cookie crumbs.
Add Dry Ingredients Add powdered sugar and Dutch-process cocoa powder to the bowl and stir all ingredients together until well combined and evenly distributed.
Incorporate Wet Ingredients Add vanilla extract, light corn syrup, and liquid to the cookie mixture and stir well using a rubber spatula until the mixture is evenly blended and all ingredients are incorporated.
Shape Balls Using a 1½-inch cookie scoop, portion out mixture and roll each scoop in your palms to create smooth balls, placing each on the lined baking sheet.
Apply Coatings Roll each ball into different optional coatings (one coating per ball) such as sprinkles, chopped nuts, or powdered sugar until completely covered, then return to the baking sheet.
Refrigerate Chill the coated balls in the refrigerator for at least 8 hours or up to overnight before transferring to a serving plate.
Chocolate Peanut Butter Balls
Mix Base Ingredients In a large bowl, combine peanut butter, softened butter, powdered sugar, and vanilla extract, mixing thoroughly until completely combined and smooth.
Form into Balls Shape the mixture into 25 uniform balls using your hands or a cookie scoop for consistent sizing.
Melt Chocolate Coating Using a double boiler, bring water to a rolling boil and add chocolate chips and wax, stirring continuously until the mixture becomes completely smooth (or melt candy coating according to package directions if using that alternative).
Dip Balls Using a spoon, dip each peanut butter ball into the melted chocolate to cover completely, then place dipped balls on a rimmed sheet pan lined with wax or parchment paper.
Add Optional Decorations Sprinkle with decorative toppings or drizzle with contrasting chocolate if desired while the coating is still wet.
Freeze to Set Place the pan in the freezer for about 30 minutes to harden the chocolate coating completely before serving or storing.
Butterfinger Balls
Beat Base Mixture Add creamy peanut butter, softened butter, and vanilla extract to a medium-sized mixing bowl and beat with a handheld mixer on medium-high speed until smooth, about 1 minute.
Add Remaining Ingredients Lower mixer speed to medium-low, then add powdered sugar, graham cracker crumbs, and ½ cup crushed Butterfingers, mixing for 1½-2 minutes until well combined.
Prepare Baking Sheet Line a baking sheet with parchment paper for placing formed balls.
Scoop and Roll Use a 1-tablespoon cookie scoop to portion mixture (heaping tablespoon), roll each portion into a nice round ball, and place on the lined baking sheet, then chill in refrigerator for at least 30 minutes.
Melt Primary Chocolate Add 8 ounces of almond bark to a microwave-safe shallow bowl and heat at full power for 45 seconds, stir, then continue heating in 30-second intervals until completely melted and smooth.
Coat Balls Remove baking sheet from refrigerator and roll each ball in melted almond bark until completely coated, using a small spoon or fork to remove from chocolate, then repeat for all balls.
Create Drizzle Melt remaining 2 ounces of almond bark in a small microwave-safe bowl using 30-second intervals, then use a drizzling spoon, fork, or piping bag to create decorative patterns on tops of each coated ball.
Add Garnish Sprinkle bits of extra crushed Butterfinger bars over the chocolate drizzle while still wet, then keep refrigerated until ready to serve.
Gelatin Coconut Balls
Prepare Work Surface Cover a moveable surface such as a baking sheet with parchment paper and set aside.
Divide Ingredients Get two medium mixing bowls and place one flavor of gelatin in each bowl (lime in one, strawberry in the other).
Add Yogurt Place ¾ cup plain Greek yogurt into each bowl with the gelatin powder.
Incorporate Coconut Place 2½ cups of desiccated coconut into each bowl.
Mix Each Color Stir each bowl with a different utensil to prevent color mixing, working until ingredients are fully combined.
Prepare Coating Bowls Get two small bowls and place ¾ cup coconut into each for final coating.
Form and Coat First Color Using gloves, roll all mixture from one bowl into 1-tablespoon-sized balls, immediately rolling each in its designated coconut bowl until fully coated, then place on prepared pan.
Repeat with Second Color Form balls from the second bowl’s mixture using the other coconut bowl for coating to maintain color separation.
Chill to Set Place the balls in the refrigerator, uncovered, for 4 hours or until completely set and firm.
Pineapple Coconut Balls
Drain Pineapple Use a fine mesh sieve to drain as much liquid as possible from the canned crushed pineapple, pressing to remove excess moisture.
Beat Cream Cheese Add softened cream cheese to a medium-size mixing bowl and beat with a handheld mixer on medium speed for about 1 minute until smooth and lump-free.
Add Gelatin Sprinkle the pineapple flavored gelatin over the cream cheese and continue mixing on medium speed just until combined.
Incorporate Remaining Ingredients Stir in crushed graham cracker crumbs and well-drained pineapple until all ingredients are thoroughly incorporated.
Chill Mixture Cover the bowl tightly with plastic wrap and chill in refrigerator for 2 hours to allow mixture to firm up for easier scooping and rolling.
Prepare for Rolling Line a baking sheet with parchment paper and add unsweetened coconut flakes to a shallow bowl.
Form and Coat Remove mixture from refrigerator, scoop out portions with a 1-tablespoon cookie scoop, roll into balls, then immediately roll in coconut flakes before placing on prepared baking sheet.
Keep Chilled Refrigerate until ready to serve to maintain proper texture and prevent softening.
Recipe Notes & Tips
General Technique Guidelines
Peanut Butter Type Matters – Natural peanut butter contains excessive oil that prevents proper setting and creates mixtures that won’t hold their shape, so commercial brands like Jif, Skippy, or Peter Pan deliver far better results in these recipes.
Room Temperature Importance – Cream cheese, butter, and other dairy ingredients must reach room temperature before mixing to ensure smooth incorporation without lumps, typically requiring about one hour out of refrigeration.
Chilling Critical for Success – Allowing shaped balls to chill thoroughly before coating in chocolate prevents them from falling apart when exposed to warm melted coating and creates cleaner, more professional-looking finished products.
Microwave Power Variations – A 1000-watt microwave was used for recipe testing, so adjustments to heating times may be necessary based on your specific appliance’s wattage to prevent burning chocolate or inadequately melting ingredients.
Consistent Sizing Benefits – Using cookie scoops rather than hand-estimating creates uniform balls that look more professional, cook or set evenly, and provide consistent serving sizes for nutritional calculations.
Chocolate Coating Techniques
Preventing Chocolate Seizing – Stirring chocolate thoroughly between each heating interval and avoiding overheating prevents the chocolate from becoming grainy or seizing, which makes it unusable for coating purposes.
Excess Chocolate Removal – Tapping the fork on the bowl’s side after dipping allows excess coating to drip off, creating thinner, more elegant coatings rather than thick, clumpy chocolate layers that overwhelm the interior filling.
Remelting as Needed – If chocolate begins hardening during the dipping process, simply return it to the microwave for 30-second bursts to restore proper consistency rather than struggling with stiffened coating.
Alternative Coating Options – Chocolate almond bark or candy melts can substitute for chocolate chips and paraffin wax, often providing easier melting properties and faster hardening times without requiring wax additions.
Bottom Edge Cleanup – Using a toothpick to run along the bottom of each ball where chocolate pools creates cleaner edges, with excess chocolate easily snapping off once hardened for more refined presentation.
Ingredient-Specific Guidance
Cake Mix Heat Treatment – When using dry cake mix in recipes without baking, heat-treating it to 165°F in the microwave kills potential bacteria from raw flour, making the mixture safe for consumption without cooking.
Coconut Texture Options – Sweetened desiccated coconut versus unsweetened varieties affects both sweetness levels and moisture absorption, with unsweetened versions requiring potential adjustments to liquid ratios in recipes.
Gelatin Powder Distribution – Sprinkling gelatin powder over other ingredients rather than dumping it in one spot prevents clumping and ensures even flavor and color distribution throughout the mixture.
Graham Cracker Crumb Consistency – Finely crushed graham crackers absorb moisture better and create smoother textures than coarsely crushed versions, so processing them thoroughly delivers superior results.
Pineapple Drainage Necessity – Removing as much liquid as possible from canned pineapple prevents mixtures from becoming too wet to form proper balls, so pressing firmly in a fine mesh strainer or even squeezing in cheesecloth produces best results.
Nutritional Information
Rice Krispies Peanut Butter Balls
- Prep Time: 15 minutes
- Chill Time: 1 hour 15 minutes
- Total Time: 1 hour 30 minutes
- Servings: 28 balls
- Calories: 166 per ball (nutritional estimate based on standard measurements)
Snack Cake Balls
- Prep Time: 30 minutes
- Chill Time: 30 minutes
- Total Time: 1 hour
- Servings: 35 balls
- Calories: 303 per ball (estimated from ingredient analysis)
Vanilla Wafer Cookie Balls
- Prep Time: 15 minutes
- Chill Time: 8 hours
- Total Time: 8 hours 15 minutes
- Servings: 26 balls
- Calories: 135 per ball (based on ingredient proportions)
Chocolate Peanut Butter Balls
- Prep Time: 20 minutes
- Total Time: 20 minutes (plus freezing)
- Servings: 25 balls
- Calories: 138 per ball (nutritional estimate)
Butterfinger Balls
- Prep Time: 15 minutes
- Chill and Rest Time: 45 minutes
- Total Time: 1 hour
- Servings: 29 balls
- Calories: 163 per ball (estimated from measurements)
Gelatin Coconut Balls
- Prep Time: 15 minutes
- Rest Time: 4 hours
- Total Time: 4 hours 15 minutes
- Servings: 38 balls
- Calories: 101 per ball (based on ingredient calculations)
Pineapple Coconut Balls
- Prep Time: 20 minutes
- Chill Time: 4 hours
- Total Time: 4 hours 20 minutes
- Servings: 28 balls
- Calories: 163 per ball (nutritional estimate)
Perfect Pairings
Beverage Combinations – These sweet treats pair beautifully with hot coffee, tea, hot chocolate, or cold milk, while the tropical varieties complement iced tea, lemonade, or sparkling water with fruit garnishes.
Dessert Platters – Arrange multiple varieties on tiered serving stands or decorative platters alongside cookies, brownies, and other small desserts to create impressive spreads for gatherings or celebrations.
Ice Cream Accompaniments – Crumble or chop any of these treats over vanilla ice cream, frozen yogurt, or gelato to add textural interest and concentrated flavor bursts to simple frozen desserts.
Gift Assortments – Package individual varieties or create mixed assortments in decorative tins, boxes, or cellophane bags tied with ribbons for homemade gifts that show thoughtfulness and effort.
Ideal Occasions
Celebrations and Gatherings – These bite-sized treats work perfectly for any gathering where guests mingle and need convenient finger foods, from casual get-togethers to more formal receptions.
Bake Sale Contributions – The professional appearance, individual portion sizes, and crowd-pleasing flavors make these ideal for school fundraisers, community events, or charitable bake sales.
Potluck Perfect – Contributing a platter of homemade treats to potluck dinners demonstrates culinary effort while requiring no reheating or special serving requirements at the destination.
Homemade Gift Options – Preparing these recipes during less busy periods and freezing them provides ready-made homemade gifts for teachers, neighbors, coworkers, or anyone deserving appreciation.
Storage & Serving Tips
Refrigeration Requirements – Most varieties require refrigeration for optimal texture and food safety, stored in airtight containers with parchment paper between layers to prevent sticking for up to 1-2 weeks.
Freezer Storage Method – Nearly all recipes freeze successfully for 1-3 months when placed in freezer-safe containers or bags with air removed, then thawed overnight in the refrigerator before serving.
Coating Reapplication – Balls coated in powdered sugar or cocoa powder need re-rolling before serving since these dry coatings absorb into the treats during refrigerated storage.
Serving Temperature Considerations – Most varieties taste best when served slightly chilled rather than straight from the freezer, so removing them from refrigeration about 10-15 minutes before serving optimizes texture and flavor.
Creative Variations to Try
Flavor Modifications – Substitute almond butter, cashew butter, or sunflower seed butter for peanut butter to accommodate allergies, or use different flavored gelatin powders to create rainbow assortments.
Coating Alternatives – Beyond chocolate, try coating balls in melted butterscotch chips, white chocolate, or candy coating in various colors, or roll them in crushed cookies, nuts, or shredded coconut.
Mix-In Additions – Fold mini chocolate chips, dried fruit pieces, crushed candy, or chopped nuts into base mixtures before forming balls to add textural variety and flavor complexity.
Dietary Adaptations – Use dairy-free cream cheese and chocolate for vegan versions, substitute gluten-free cookies or crackers where applicable, or choose sugar-free gelatin and sweeteners for reduced-sugar options.
Troubleshooting Common Issues
Mixture Too Sticky – If the mixture becomes too sticky to roll, refrigerate it for 10-15 minutes to firm up, or gradually add small amounts of powdered sugar (1 tablespoon at a time) until reaching workable consistency.
Balls Falling Apart – Insufficient chilling before coating or too much added liquid causes structural failure, so ensure proper refrigeration times and accurate ingredient measurements, particularly when draining canned fruits.
Chocolate Coating Cracking – Temperature differences between cold balls and warm chocolate cause cracking, so allow chilled balls to sit at room temperature for 5-10 minutes before dipping to minimize thermal shock.
Uneven Coating Coverage – Using a fork rather than fingers for dipping provides better control and more even coverage, while rotating the ball in the chocolate ensures all surfaces receive coating.
Why This Recipe Collection Works
This diverse collection succeeds by utilizing fundamental confectionery principles that create stable, delicious treats without requiring baking expertise. The peanut butter-based recipes leverage the natural binding properties of commercial peanut butter combined with powdered sugar, which creates moldable mixtures that firm when chilled. The cream cheese varieties utilize full-fat cream cheese’s emulsifying properties that bind crumbled ingredients while adding richness and tangy flavor contrast. The gelatin-coconut combinations demonstrate how flavored gelatin powder provides both taste and color while the coconut’s structure creates form without requiring traditional binding agents. Chilling periods throughout these recipes serve multiple purposes: they firm up mixtures for easier handling, prevent structural collapse during chocolate coating, and allow flavors to meld and intensify. The chocolate coating process employs melting discs or almond bark rather than pure chocolate because these products contain stabilizers that help them harden quickly and maintain glossy finishes without tempering. Caloric values range from 101 to 303 calories per serving depending on recipe complexity and ingredient richness, with lighter options like the gelatin coconut balls offering satisfying treats at just over 100 calories, while more indulgent varieties like the snack cake balls provide substantial satisfaction for special occasions at higher caloric levels.
Final Thoughts
This comprehensive no-bake treat collection empowers home cooks to create impressive confections that rival professional candy shop offerings without requiring specialized equipment, advanced techniques, or significant time investments. The variety of flavor profiles—from classic peanut butter and chocolate combinations to tropical pineapple coconut creations—ensures options for diverse taste preferences and dietary considerations. The elimination of baking steps makes these recipes accessible to beginners while still delivering results that satisfy experienced cooks seeking efficient preparation methods. The make-ahead nature combined with excellent freezer storage capabilities provides tremendous flexibility for meal planning, party preparation, and gift-giving throughout the year. Whether preparing a single recipe for family enjoyment or creating assorted platters showcasing multiple varieties, these treats consistently deliver crowd-pleasing results. The relatively modest caloric ranges, particularly with lighter options available, allow these treats to fit within various dietary approaches when consumed mindfully as special occasion indulgences rather than everyday staples. From the satisfying crunch of Rice Krispies studded peanut butter balls to the smooth tropical appeal of pineapple coconut creations, this collection demonstrates that outstanding confections don’t require ovens, complex techniques, or professional training—just quality ingredients, proper technique, and the confidence to create homemade treats that bring joy to both makers and recipients.