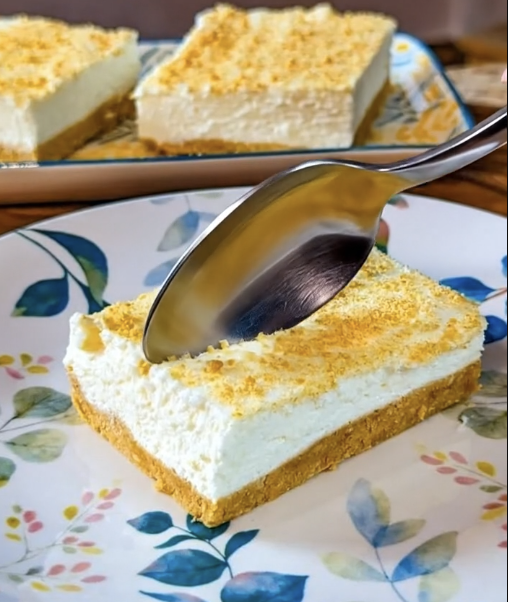
These luscious cheesecake bars deliver all the rich, creamy indulgence of classic New York-style cheesecake in a simplified, easy-to-serve bar format. The filling features tangy cream cheese enriched with sour cream and brightened with fresh lemon zest, creating a smooth, dense texture that’s neither too heavy nor too light. Set atop a buttery graham cracker crust with hints of brown sugar warmth, these bars offer the perfect balance of sweet and tangy flavors with a satisfying textural contrast between the crisp base and silky filling.
Why You’ll Love This Recipe
Simpler Than Traditional Cheesecake – These bars eliminate the stress of water baths, springform pans, and worrying about cracks, delivering the same luxurious texture and flavor with straightforward baking techniques that any home baker can master.
Perfect Portion Control – The bar format creates uniform, neat squares that are easier to serve than wedges, making them ideal for parties, potlucks, and gatherings where presentation and consistent sizing matter.
Make-Ahead Friendly – These bars actually require overnight chilling, which means you can prepare them entirely in advance without any last-minute stress, and they hold beautifully in the refrigerator for up to three days.
Foolproof Foil Lining Method – The aluminum foil overhang creates a built-in handle that allows you to lift the entire cheesecake out of the pan cleanly, eliminating the challenge of cutting and serving directly from the baking dish.
Balanced Lemon Brightness – The subtle addition of fresh lemon zest and juice cuts through the richness of the cream cheese without overpowering it, creating a more complex flavor profile than plain cheesecake.
Freezer-Friendly Convenience – These bars freeze exceptionally well for up to three months, allowing you to keep a batch on hand for unexpected guests or to portion out individual servings for controlled indulgence.
Ingredients You’ll Need
For the Crust
1¼ cups graham cracker crumbs, from 10 whole crackers – Forms the classic, slightly sweet foundation with a sandy texture; use standard honey graham crackers and process them finely for a cohesive crust that holds together.
4 tablespoons unsalted butter, melted – Binds the crumbs together and adds rich, buttery flavor while creating moisture that helps the crust set and crisp during baking.
¼ cup (packed) dark brown sugar – Contributes molasses-rich sweetness and moisture that complements the graham crackers; the dark variety provides deeper caramel notes than light brown sugar.
⅛ teaspoon salt – Enhances the butter and graham flavors while balancing the sweetness and preventing the crust from tasting flat or one-dimensional.
For the Filling
16 oz (two 8-oz packages) cream cheese, at room temperature – The foundation of the filling that provides tangy richness and creamy density; room temperature is essential for smooth blending without lumps.
1 cup granulated sugar – Sweetens the filling while also affecting texture by tenderizing the protein structure; granulated sugar dissolves more smoothly than powdered sugar in this application.
1½ tablespoons all-purpose flour – Stabilizes the filling and helps prevent cracking by absorbing excess moisture and providing structure during baking without making the texture cakey.
¼ cup sour cream – Adds tangy complexity and extra creaminess while contributing to the signature dense texture; the acidity also helps tenderize the protein network.
3 large eggs – Provide structure, richness, and help set the filling into a sliceable consistency; the proteins coagulate during baking to create the characteristic cheesecake texture.
2½ teaspoons vanilla extract – Adds aromatic depth and rounds out the flavor profile; use pure vanilla extract rather than imitation for the best flavor complexity.
½ teaspoon packed freshly grated lemon zest, from 1 lemon – Delivers bright citrus oils and aromatic compounds that cut through the richness without adding liquid; fresh zest is essential as dried lacks the essential oils.
1 teaspoon lemon juice – Contributes acidity that brightens the overall flavor and balances the richness of the cream cheese and sour cream.
⅛ teaspoon salt – Enhances all the other flavors, balances sweetness, and prevents the filling from tasting flat; essential for proper flavor development.
Step-by-Step Instructions
Prepare Your Pan and Preheat Preheat your oven to 375°F (190°C) and position a rack in the middle position for even heat distribution. Line an 8-inch square baking dish with heavy-duty aluminum foil, extending it over at least two opposite sides to create handles, then spray the foil lightly with nonstick cooking spray to prevent sticking.
Create the Graham Cracker Crust In a medium bowl, combine the graham cracker crumbs, melted butter, dark brown sugar, and salt, stirring thoroughly with a fork or spoon. Use your fingertips to break up any stubborn lumps of brown sugar and ensure the mixture resembles wet sand with no dry patches, then press it firmly and evenly into the bottom and 1 inch up the sides of the prepared pan, creating a compact, uniform layer.
Par-Bake the Crust Bake the crust at 375°F for 10 minutes until it’s set and lightly fragrant but not deeply browned. Remove from the oven and set aside to cool slightly while you reduce the oven temperature to 325°F (165°C) and prepare the filling—this initial baking creates a barrier that prevents the crust from becoming soggy.
Mix the Cream Cheese Base In the bowl of an electric mixer fitted with the paddle attachment or beaters, beat the room-temperature cream cheese, granulated sugar, and flour together on medium speed for about 1 minute, just until smooth and free of lumps. Scrape down the sides of the bowl to ensure even mixing, but avoid over-beating which can incorporate too much air and cause cracking.
Incorporate the Remaining Filling Ingredients Add the sour cream, eggs, vanilla extract, lemon zest, lemon juice, and salt to the cream cheese mixture. Beat on low speed for approximately 1 minute, just until everything is combined and the mixture is uniform in color and consistency—over-mixing at this stage incorporates excessive air that can lead to cracks and an undesirable texture.
Pour and Bake the Filling Pour the smooth batter over the slightly cooled graham cracker crust, using a spatula to distribute it evenly to the corners. Verify that your oven has cooled to 325°F, then bake for 40-45 minutes until the edges are set but the center still jiggles slightly when gently shaken—an instant-read thermometer inserted 1 inch from the edge should read between 180-190°F (82-88°C).
Cool Gradually and Chill Thoroughly Remove the bars from the oven and allow them to cool at room temperature for 30 minutes to prevent thermal shock that can cause cracking. Transfer to the refrigerator and chill for at least 6 hours, but preferably overnight, to allow the filling to firm up completely and the flavors to meld properly before cutting.
Lift, Cut, and Serve Use the foil overhang to lift the entire cheesecake out of the pan and onto a cutting board. Cut into 16 even squares using a sharp knife, wiping the blade clean with a damp cloth between each cut for neat, professional-looking edges, then refrigerate until ready to serve.
Recipe Notes & Tips
Room Temperature Cream Cheese is Non-Negotiable – Cold cream cheese will not blend smoothly and will create lumps in your filling; remove it from the refrigerator 1-2 hours before mixing, or cut it into cubes for faster softening at room temperature.
Avoid Over-Mixing the Batter – Once you add the eggs, mix only until just combined; excessive mixing incorporates air bubbles that expand during baking and can cause surface cracks or an undesirably airy texture.
Temperature Monitoring Prevents Over-Baking – The slight jiggle in the center is essential; the filling continues cooking from residual heat as it cools, and over-baking creates a dry, grainy texture rather than the desired creamy consistency.
Heavy-Duty Foil Prevents Tearing – Regular thin foil may tear when you lift the cheesecake out; use heavy-duty foil or create a double layer of regular foil to ensure it supports the weight without breaking.
Clean Knife Cuts for Professional Appearance – Warm the knife under hot water and wipe it completely dry between cuts, or use a damp cloth to clean cream cheese residue between slices for perfectly clean edges.
Patience with Chilling Time Ensures Success – While 6 hours is the minimum, overnight chilling allows the texture to fully set and the flavors to develop properly; rushed chilling results in soft, difficult-to-cut bars.
Nutritional Information
Prep Time: 20 minutes
Cook Time: 1 hour 15 minutes (10 minutes for crust + 40-45 minutes for filling + 30 minutes cooling)
Total Time: 1 hour 35 minutes, plus at least 6 hours chilling time
Servings: 16 bars
Calories: 248 calories per bar

Perfect Pairings
Fresh Berry Compote – Serve each bar with a spoonful of macerated strawberries, raspberry sauce, or mixed berry compote to add fruity brightness and color contrast that complements the creamy filling.
Whipped Cream Dollop – Top with a light swirl of freshly whipped cream or stabilized whipped cream for an elegant presentation and to add airy texture that contrasts with the dense cheesecake.
Coffee or Espresso – Pair with a cup of strong coffee, espresso, or cappuccino; the bitter notes of coffee create a perfect counterpoint to the sweet, rich cheesecake.
Chocolate Drizzle – Finish with a fine drizzle of melted dark or white chocolate across the top for visual appeal and an additional layer of flavor complexity.
Ideal Occasions
Holiday Dessert Tables – These bars are perfect for Thanksgiving, Christmas, or Easter gatherings where you need a make-ahead dessert that serves a crowd and looks impressive on a buffet.
Bridal and Baby Showers – The elegant, uniform squares work beautifully for afternoon tea settings and special celebrations where presentation and easy serving are priorities.
Potluck Contributions – The portable, pre-cut format makes these ideal for bringing to parties, church suppers, or office gatherings where you need something that travels well and serves easily.
Birthday Party Alternative – When you want something more sophisticated than traditional cake but equally celebratory, these cheesecake bars offer a crowd-pleasing option that appeals to all ages.
Storage & Serving Tips
Refrigerator Storage – Store leftover bars in an airtight container or cover the pan tightly with plastic wrap and refrigerate for up to 3 days; the flavors actually improve slightly after the first day as they continue to meld.
Freezing Individual Portions – Freeze individual bars on a parchment-lined baking sheet until solid, then transfer to a freezer bag with parchment squares between layers to prevent sticking; this allows you to thaw only what you need.
Proper Thawing Method – Remove frozen bars from the freezer 2-3 hours before serving and thaw in the refrigerator for best texture; thawing at room temperature can cause condensation that makes the bars soggy.
Serving Temperature – Serve these bars well-chilled directly from the refrigerator for the firmest texture and cleanest cuts; allowing them to sit at room temperature for more than 15 minutes can make them too soft to handle neatly.
Creative Variations to Try
Chocolate Swirl Version – Melt 3 oz of semisweet chocolate and swirl it through the filling before baking using a knife or skewer, creating an elegant marbled effect that adds rich chocolate flavor.
Cookie Crust Alternative – Replace the graham crackers with crushed Oreos (cream removed), vanilla wafers, or gingersnaps to create different flavor profiles while maintaining the same crust-to-filling ratio.
Fruit-Topped Presentation – After chilling, spread a thin layer of raspberry, strawberry, or cherry pie filling over the top for a classic cheesecake presentation with added fruit flavor and visual appeal.
Pumpkin Spice Fall Version – Replace ½ cup of the cream cheese with pumpkin puree, add 1 teaspoon pumpkin pie spice, and reduce the lemon zest for a seasonal autumn variation that rivals pumpkin pie.
Troubleshooting Common Issues
Cracked Surface on Top – This occurs from over-mixing (too much air), over-baking, or too-rapid cooling; ensure you mix just until combined, bake until slightly jiggly in the center, and cool gradually at room temperature before refrigerating.
Soggy or Soft Crust – The crust may not have been pressed firmly enough or wasn’t par-baked properly; press the crust mixture very firmly and compactly, and ensure it bakes for the full 10 minutes before adding the filling.
Difficulty Removing from Pan – If the foil tears or the bars stick, run a knife around the edges first before lifting, or use heavier-duty foil next time; you can also freeze the bars for 30 minutes to firm them before attempting to lift.
Grainy or Curdled Texture – This results from over-baking or using cold ingredients; always use room-temperature cream cheese and eggs, and bake only until the edges are set with a slight jiggle in the center.
Why This Recipe Works
The success of these cheesecake bars relies on several key techniques that ensure a smooth, creamy texture and clean presentation. Par-baking the graham cracker crust creates a moisture barrier that prevents sogginess when the wet filling is added, while the brown sugar in the crust adds depth and helps it hold together during cutting. The combination of cream cheese and sour cream provides the ideal balance of tang and richness, while the small amount of flour acts as a stabilizer that helps the filling set without becoming rubbery or dense. Baking at the lower temperature of 325°F after the initial crust baking prevents the proteins in the eggs and dairy from cooking too quickly, which would create a grainy texture or cause excessive browning. The lemon zest and juice serve multiple purposes: the citrus oils add aromatic brightness, the acidity helps tenderize the protein structure, and the flavor cuts through the richness to prevent the bars from tasting heavy or cloying. The gradual cooling process—30 minutes at room temperature followed by extended refrigeration—allows the filling to set properly without the thermal shock that causes cracks. Each bar contains 248 calories, making them a more moderate indulgence than many full-size cheesecakes when portion control is maintained.
Final Thoughts
These cheesecake bars represent the perfect solution for anyone who loves classic New York-style cheesecake but wants a simpler, more practical preparation method. By eliminating the water bath, springform pan, and anxiety about cracks, this recipe makes luxurious cheesecake accessible to bakers of all skill levels while maintaining the dense, creamy texture that makes cheesecake so beloved. The bar format not only simplifies serving but also creates more versatile presentation options—you can dress them up with fruit compote and whipped cream for elegant affairs or serve them plain for casual gatherings. The make-ahead nature of the recipe removes last-minute stress from entertaining, and the freezer-friendly quality means you can always have a special dessert ready when needed. While these bars are certainly an indulgence at 248 calories each, the rich satisfaction they provide means a single bar is often enough to satisfy a sweet craving, and the controlled portion size helps with moderation. Whether you’re an experienced baker or just starting out, these cheesecake bars deliver restaurant-quality results with home-kitchen convenience.