
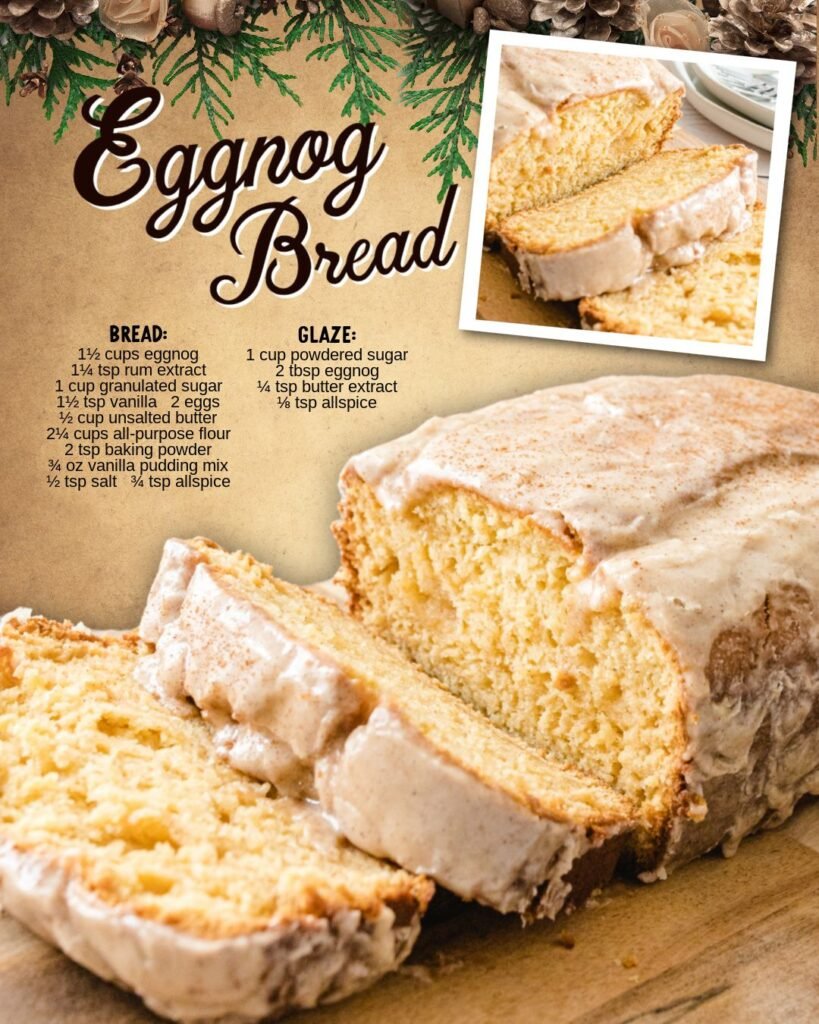
This Vintage Eggnog Bread is a moist, tender quick bread infused with the festive flavors of eggnog, warm spices, and a hint of rum extract, then crowned with a sweet eggnog glaze that soaks into every slice. By incorporating both eggnog and vanilla pudding mix into the batter, this recipe creates exceptionally soft texture and rich flavor that captures the essence of the holiday season in bread form. The result is a beautiful loaf with golden-brown crust, tender crumb studded with nutmeg and allspice, and a glossy glaze that makes it perfect for holiday breakfast tables, afternoon tea, or gift-giving to spread seasonal cheer.
Why You’ll Love This Recipe
- Festive Holiday Flavor – Captures the beloved taste of eggnog with warm spices like nutmeg and allspice, plus vanilla and rum extracts that create authentic holiday cheer in every bite.
- Extra-Moist Secret Ingredient – The addition of instant vanilla pudding mix creates exceptionally tender, moist texture that stays fresh for days without drying out like many quick breads.
- Simple Quick Bread Method – Uses straightforward mixing techniques without yeast, rising time, or complicated steps, making impressive holiday bread accessible to bakers of all skill levels.
- Beautiful Presentation – The glossy eggnog glaze cascading down the sides creates bakery-worthy appearance perfect for holiday tables, brunch spreads, or gift-giving to neighbors and loved ones.
- Make-Ahead Convenience – Actually improves after a day as flavors meld and the glaze softens into the bread, making it ideal for preparing ahead of holiday gatherings or busy mornings.
- Versatile Serving Options – Works equally well as breakfast bread, afternoon snack with coffee or tea, or elegant dessert when served slightly warm with whipped cream or butter.
Ingredients You’ll Need
For the Eggnog Bread:
- 2¼ cups all-purpose flour – Provides structure and body for the tender quick bread base
- 3.4 ounces vanilla instant pudding mix (one standard box) – Creates exceptionally moist texture and adds sweet vanilla flavor throughout
- 2 teaspoons baking powder – Provides leavening that creates light, tender crumb without yeast or rising time
- ½ teaspoon salt – Balances sweetness and enhances all other flavors in the bread
- ¼ teaspoon ground nutmeg – Contributes the signature warm, spicy notes associated with traditional eggnog
- ¼ teaspoon ground allspice – Adds complexity with its blend of cinnamon, nutmeg, and clove flavors
- ½ cup unsalted butter, melted and cooled – Provides richness, moisture, and tender texture without making the bread heavy
- 1 cup granulated sugar – Sweetens the bread and helps create tender crumb through its interaction with other ingredients
- 2 large eggs, room temperature – Binds ingredients, adds richness, and contributes to the bread’s structure and golden color
- 1¼ cups eggnog (store-bought or homemade without alcohol) – Delivers the primary holiday flavor and provides necessary liquid for proper batter consistency
- 1 teaspoon vanilla extract – Enhances all flavors with aromatic warmth and depth
- 1 teaspoon rum extract – Adds authentic eggnog flavor reminiscent of traditional spiked versions without actual alcohol
For the Eggnog Glaze:
- 1 cup powdered sugar, sifted – Creates the sweet, smooth glaze base that hardens to a glossy finish
- ¼ teaspoon rum extract – Reinforces the eggnog flavor theme in the topping
- ⅛ teaspoon ground nutmeg – Adds visible spice flecks and reinforces the warm spice profile
- 2 tablespoons eggnog – Provides liquid and flavor that ties the glaze to the bread itself
- 1-2 tablespoons milk (whole or 2%) – Thins the glaze to proper pourable consistency for even coating
Step-by-Step Instructions
Preheat and Prepare Pan Preheat your oven to 350°F and line a 9×5-inch loaf pan with parchment paper, ensuring it extends over the long sides of the pan by at least 2 inches. This overhang creates handles for easy removal after baking and prevents the bread from sticking to the pan.
Combine Dry Ingredients In a medium bowl, sift together the all-purpose flour, vanilla instant pudding mix, baking powder, salt, ground nutmeg, and ground allspice. Whisking these dry ingredients together ensures even distribution of leavening and spices throughout the bread, preventing pockets of baking powder or spice clumps.
Mix Wet Ingredients In a large mixing bowl, combine the melted and cooled butter, granulated sugar, room temperature eggs, eggnog, vanilla extract, and rum extract. Using an electric mixer on medium speed, beat for 2-3 minutes until the mixture is smooth, fully combined, and slightly lighter in color from incorporating air.
Combine Wet and Dry Add the bowl of dry ingredients to the wet ingredient mixture all at once. Mix on low speed for 30-60 seconds, just until the flour disappears and no dry pockets remain—the batter should be slightly thick and smooth but don’t overmix, which develops gluten and creates tough, dense bread rather than tender crumb.
Transfer to Pan Pour the batter into your prepared loaf pan, using a rubber spatula to scrape all the batter from the bowl. Spread the top into an even layer, smoothing it gently with the spatula to ensure uniform baking and an attractive finished appearance.
Bake Until Done Place the loaf pan in the preheated 350°F oven and bake for 55-60 minutes, or until a toothpick or cake tester inserted into the center comes out clean or with just a few moist crumbs clinging to it. If the top begins browning too quickly after 40-45 minutes, tent loosely with aluminum foil to prevent burning while the center finishes cooking.
Cool in Pan Remove the bread from the oven and let it cool in the pan on a wire rack for 10 minutes. This brief resting period allows the structure to set enough for safe handling while preventing the bottom from becoming soggy from trapped steam.
Remove and Cool Completely Using the parchment paper overhang as handles, carefully lift the bread from the pan and transfer it to a wire rack. Remove the parchment paper from the sides and bottom, then allow the bread to cool completely to room temperature before glazing—this takes approximately 1-2 hours and is essential for proper glaze consistency.
Prepare the Eggnog Glaze In a medium bowl, whisk together the sifted powdered sugar, rum extract, ground nutmeg, and eggnog until smooth and well combined. The mixture will be quite thick at this point—almost paste-like consistency.
Adjust Glaze Consistency Add 1 tablespoon of milk to the glaze and whisk thoroughly, observing the consistency. The glaze should be thin enough to pour and drip down the sides of the bread but thick enough to create an opaque coating rather than running off completely. Add the second tablespoon of milk only if needed to achieve this pourable but coating consistency.
Glaze the Bread Place a sheet of parchment paper or foil under the wire rack to catch drips, then spoon the glaze evenly over the top of the completely cooled bread. Use the back of the spoon to encourage the glaze to drip naturally down the sides, creating an attractive cascading effect.
Set Before Slicing Allow the glazed bread to sit at room temperature for 30-60 minutes until the glaze has firmed up enough that it won’t smear when sliced. The glaze will remain slightly soft but should no longer be wet or sticky to the touch.
Slice and Serve Using a sharp serrated knife, slice the bread into ¾-inch to 1-inch thick slices, wiping the knife clean between cuts for neat presentation. Serve at room temperature or slightly warm for the best flavor and texture experience.
Recipe Notes & Tips
- Eggnog Quality Matters – Use a brand of eggnog you’d enjoy drinking, as its flavor will be prominent in the finished bread; avoid ultra-pasteurized or off-brand versions with artificial taste.
- Pudding Mix Function – The instant pudding mix isn’t just for flavor—it contains modified starches that create exceptional moisture retention and tender texture that keeps the bread fresh for days.
- Room Temperature Eggs – Warm eggs incorporate more smoothly into the batter and create better emulsion with the butter; cold eggs can cause the butter to resolidify and create lumpy batter.
- Don’t Overmix – Mix the batter just until the flour disappears; overmixing develops gluten that creates tough, dense bread with tunnels instead of tender, even crumb.
- Toothpick Test – The toothpick should come out clean or with a few moist crumbs; if it comes out with wet batter, continue baking in 5-minute increments until done.
- Complete Cooling Essential – Applying glaze to warm bread causes it to soak in completely and become invisible rather than creating the attractive coating; patience ensures proper presentation.
Nutritional Information
- Prep Time: 10 minutes (mixing ingredients)
- Cook Time: 55-60 minutes (baking time)
- Cooling Time: 1-2 hours (passive cooling before glazing)
- Total Time: Approximately 2-3 hours (including all steps)
- Servings: 8 slices (from one standard loaf)
- Calories: Approximately 490 per slice (includes glaze; exact amount varies with slice thickness)
Perfect Pairings
- Serve with hot coffee, chai tea, or hot chocolate for breakfast or afternoon tea that complements the warm spice flavors beautifully.
- Pair with whipped cream, softened butter, or cream cheese spread for guests who enjoy richer accompaniments with their bread.
- Complement with fresh berries or fruit compote to add brightness and acidity that balances the sweet, rich bread.
- Accompany with crispy bacon or breakfast sausage for a sweet-and-savory brunch combination that satisfies multiple cravings.
Ideal Occasions
- Perfect for Christmas morning breakfast or holiday brunch spreads when you want festive bread that captures the spirit of the season without requiring early morning baking.
- Excellent choice for neighbor gifts, teacher appreciation, or holiday gift-giving when wrapped in cellophane with festive ribbon for thoughtful, homemade presents.
- Ideal for cookie exchanges and holiday baking parties as an alternative to traditional cookies that showcases your baking range and seasonal flavors.
- Great option for afternoon tea parties, book club meetings, or winter gatherings when you need elegant, sliceable treats that serve many guests from one loaf.
Storage & Serving Tips
- Store bread wrapped tightly in plastic wrap or in an airtight container at room temperature for up to 4 days; the pudding mix keeps it remarkably moist throughout storage.
- Refrigerate stored bread for up to 1 week if your kitchen is warm or humid, bringing slices to room temperature or warming briefly before serving for best flavor.
- Freeze unglazed bread wrapped tightly in plastic wrap and aluminum foil for up to 3 months; thaw at room temperature and add fresh glaze when ready to serve.
- Warm individual slices in the microwave for 10-15 seconds or in a toaster oven for added comfort and to enhance the butter’s richness and spice aromas.
Creative Variations to Try
- Cranberry Orange Version – Add 1 cup dried cranberries and 1 tablespoon orange zest to the batter, and use orange juice instead of milk in the glaze for tart, fruity variation.
- Chocolate Chip Addition – Fold 1 cup mini chocolate chips into the batter for chocolate-eggnog combination that appeals to chocolate lovers while maintaining holiday character.
- Bourbon Eggnog Style – Replace rum extract with bourbon-flavored extract or add 1 tablespoon actual bourbon to both bread and glaze for more authentic spiked eggnog flavor.
- Streusel Topping – Skip the glaze and add a cinnamon-sugar streusel topping before baking for different texture and appearance that’s equally festive.
Troubleshooting Common Issues
- Bread sinking in center – Overmixed batter or oven temperature too low; mix just until combined and verify oven temperature with an oven thermometer for accuracy.
- Dry, crumbly texture – Overbaked or measured flour incorrectly; use the toothpick test and measure flour by spooning into cups and leveling rather than scooping directly.
- Glaze too thin and runs off – Added too much milk; start with just 1 tablespoon and add more gradually only if needed, remembering the glaze thickens as it sits.
- Glaze soaking in completely – Applied to warm bread; always cool bread completely to room temperature before glazing to ensure proper coating that stays on top.
Why This Recipe Works
This eggnog bread succeeds by combining the reliable quick bread method with strategic ingredients that maximize moisture, flavor, and holiday appeal. The instant vanilla pudding mix is the secret weapon—its modified starches absorb and retain moisture while contributing sweet vanilla flavor and creating exceptionally tender crumb that stays fresh much longer than standard quick breads. The combination of eggnog as the primary liquid with vanilla and rum extracts delivers authentic eggnog flavor without needing actual alcohol, making it family-friendly while still tasting festive and special. The warm spices of nutmeg and allspice reinforce the eggnog character and add aromatic complexity that makes the bread smell as wonderful as it tastes. Melted butter rather than creamed butter creates a more tender, cake-like texture appropriate for quick breads, while the eggs provide structure and richness. The glaze serves dual purposes—it adds visual appeal and an extra layer of eggnog flavor while also sealing moisture into the bread, extending its freshness. Baking at 350°F for nearly an hour ensures the thick batter cooks through completely without burning the exterior. At approximately 490 calories per slice, this is an indulgent treat with significant calories from sugar, butter, and eggnog—making it best enjoyed as a special holiday indulgence rather than everyday breakfast, though the nostalgic flavors and festive spirit make it worth every calorie during the holiday season.
Final Thoughts
This Vintage Eggnog Bread represents the kind of seasonal baking that makes the holidays special—it fills your kitchen with the warm aromas of nutmeg and vanilla, creates beautiful slices for gift-giving or entertaining, and tastes unmistakably festive without requiring advanced techniques or unusual ingredients. The recipe’s vintage designation speaks to its enduring appeal; eggnog breads have graced holiday tables for generations because they perfectly capture seasonal flavors in a format that’s easier than pie, more interesting than cookies, and more shareable than a whole cake. While this version celebrates traditional eggnog flavor with its warm spices and rum extract, those avoiding alcohol flavoring can simply omit the rum extract without significantly affecting the overall character—the eggnog itself provides plenty of holiday spirit. Whether you’re continuing a family tradition, starting a new one, or simply looking for ways to use up that carton of eggnog sitting in your refrigerator, this moist, flavorful bread delivers consistent results that make the holidays feel a little more special, a little more delicious, and a lot more worth celebrating with loved ones gathered around your table.