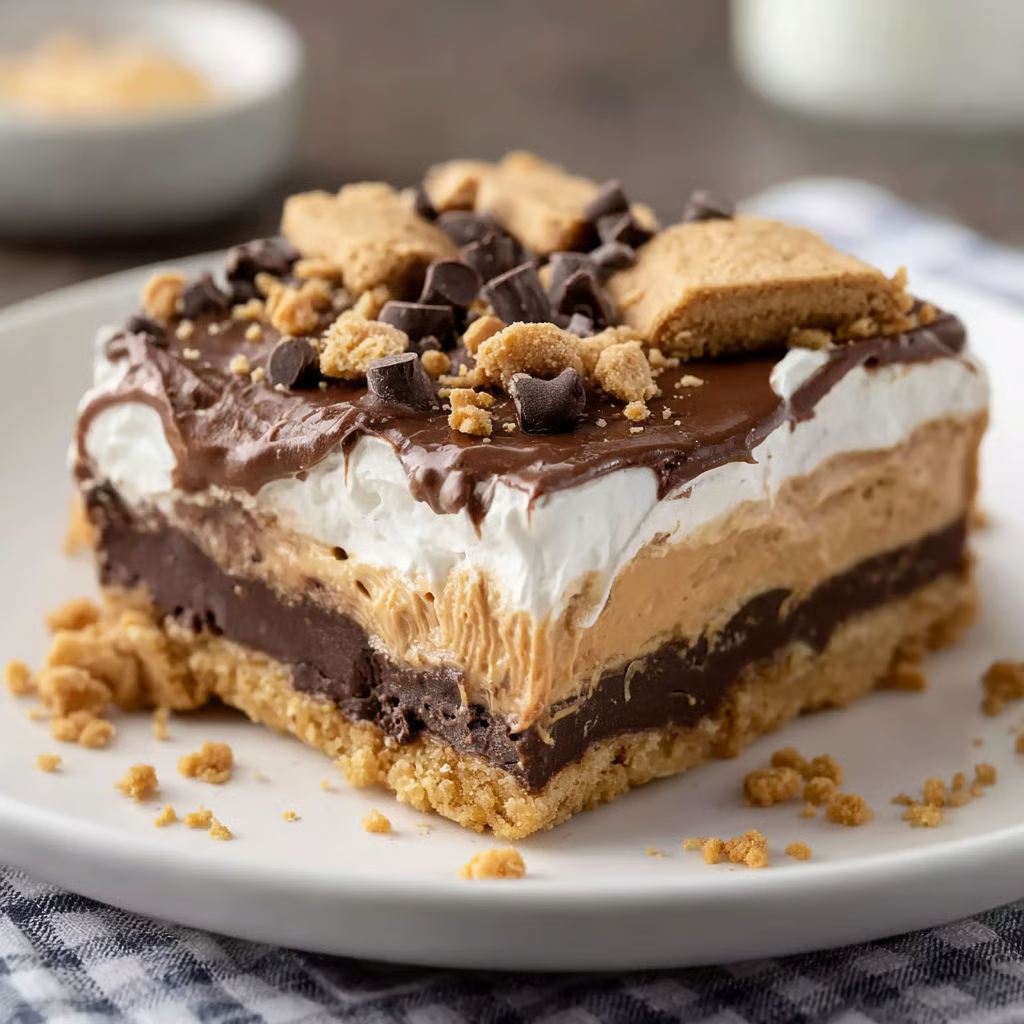
Chocolate Peanut Butter Dream Bars are a rich, layered dessert that combines a buttery cookie crust, smooth chocolate pudding, and a creamy peanut butter filling topped with whipped topping and crunchy chocolate chips. Each layer contributes a different texture—crumbly, creamy, fluffy, and crunchy—making every bite deeply satisfying. Perfect for gatherings, potlucks, or a weekend treat, these chilled dessert bars deliver bold chocolate and peanut butter flavor in an easy-to-serve format.
Why You’ll Love This Recipe
- Perfect Chocolate–Peanut Butter Combination – The classic pairing of chocolate and peanut butter creates a rich and balanced flavor profile.
- Layered Texture Experience – Crunchy cookie crust, creamy pudding, smooth peanut butter filling, and fluffy whipped topping create irresistible contrast.
- Make-Ahead Friendly Dessert – The bars need chilling time, making them ideal for preparing in advance.
- Simple Pantry Ingredients – Most components use easy-to-find ingredients and require minimal preparation.
- Crowd-Pleasing Dessert Bars – Easy to slice and serve, making them perfect for parties and gatherings.
- No Complicated Techniques – Straightforward layering steps make this recipe accessible even for beginner bakers.
Ingredients You’ll Need
Cookie Base
- 16 oz peanut butter sandwich cookies, crushed – Forms the crunchy base with rich peanut butter flavor.
- 8 tablespoons unsalted butter, melted – Binds the cookie crumbs together and creates a firm crust.
Chocolate Layer
- 1.5 cups whole milk – Combines with pudding mix to create a smooth, creamy chocolate layer.
- 3.9 oz instant chocolate pudding mix – Thickens quickly to form a rich chocolate filling.
Peanut Butter Layer
- 4 oz cream cheese, softened – Provides structure and a smooth, tangy base for the filling.
- 1/2 cup powdered sugar – Sweetens and smooths the peanut butter mixture.
- 1/2 cup creamy peanut butter – Adds rich flavor and creamy texture.
Topping
- 8 oz whipped topping – Creates a light, fluffy finishing layer.
- 1/2 cup milk chocolate chips – Adds bursts of chocolate flavor and a slight crunch.
- 1/2 cup peanut butter chips – Enhances the peanut butter flavor throughout the topping.
- Reserved crushed peanut butter sandwich cookies – Provides a crunchy garnish and visual appeal.
Step-by-Step Instructions
Prepare the Oven and Pan
Preheat the oven to 350°F (177°C). Lightly coat an 8×8-inch baking pan with nonstick spray to prevent sticking.
Make the Cookie Crust
In a bowl, mix the crushed peanut butter sandwich cookies with the melted butter until the crumbs are evenly moistened.
Bake the Crust
Press the cookie mixture firmly into the bottom of the prepared pan to form an even crust. Bake for 10 minutes, then remove from the oven and allow the crust to cool completely.
Prepare the Chocolate Pudding Layer
In a clean bowl, whisk together the instant chocolate pudding mix and cold milk until the mixture thickens and becomes smooth.
Add the Chocolate Layer
Spread the chocolate pudding evenly over the cooled crust using a spatula. Place the pan in the refrigerator while preparing the next layer.
Make the Peanut Butter Filling
Beat the softened cream cheese for about 1 minute until smooth. Add the peanut butter and mix until fully combined and creamy.
Sweeten the Filling
Reduce mixer speed to low and gradually add powdered sugar, mixing until the filling becomes smooth and evenly blended.
Layer the Peanut Butter Mixture
Remove the pan from the refrigerator and gently spread the peanut butter mixture over the chocolate pudding layer, smoothing the surface evenly.
Add the Whipped Topping
Spread the whipped topping evenly across the peanut butter layer, creating a smooth and fluffy top layer.
Add the Final Toppings
Sprinkle milk chocolate chips, peanut butter chips, and the reserved crushed peanut butter sandwich cookies evenly over the whipped topping.
Chill and Slice
Refrigerate the dessert for at least 2 hours to allow the layers to set. Once chilled, cut into 2-inch squares and serve.
Recipe Notes & Tips
- Cool the Crust Completely – Adding pudding to a warm crust can cause the layers to melt or separate.
- Use Softened Cream Cheese – This ensures a smooth peanut butter filling without lumps.
- Spread Layers Gently – Work slowly to keep the pudding layer intact while adding the peanut butter mixture.
- Chill Thoroughly Before Cutting – Proper chilling helps the bars hold their shape.
- Use a Sharp Knife for Clean Cuts – Wipe the knife between slices for neat squares.
- Reserve Cookie Crumbs for Garnish – This adds both texture and visual appeal.
Nutritional Information
- Prep Time: 20 minutes
- Cooking Time: 10 minutes
- Chilling Time: 2 hours
- Total Time: Approximately 2 hours 30 minutes
- Servings: About 16 dessert bars
- Calories: Estimated per serving (values may vary depending on ingredients used)

Perfect Pairings
- Cold Milk – A classic pairing that complements the chocolate and peanut butter flavors.
- Vanilla Ice Cream – Adds creamy contrast and enhances the dessert’s richness.
- Hot Coffee or Espresso – Balances the sweetness with a bold roasted flavor.
- Chocolate Drizzle – Extra chocolate sauce can intensify the dessert experience.
Ideal Occasions
- Potlucks and Parties – Easy to transport and serve in squares.
- Holiday Dessert Tables – A rich treat that stands out among traditional desserts.
- Weekend Baking Projects – A fun layered dessert to prepare ahead of time.
- Family Movie Nights – A comforting sweet treat to share.
Storage & Serving Tips
- Refrigerate Leftovers – Store in an airtight container for up to 4 days.
- Serve Chilled – The bars maintain their structure and flavor best when cold.
- Cover the Pan Tightly – Prevents the whipped topping from drying out.
- Freeze for Longer Storage – Freeze individual bars for up to 1 month.
Creative Variations to Try
- Oreo Chocolate Version – Replace peanut butter cookies with chocolate sandwich cookies.
- Dark Chocolate Twist – Use dark chocolate pudding and dark chocolate chips.
- Crunchy Peanut Butter Filling – Substitute crunchy peanut butter for added texture.
- Salted Peanut Butter Bars – Sprinkle flaky sea salt on top for a sweet-salty contrast.
Troubleshooting Common Issues
- Layers Sliding Apart – Chill longer before slicing to allow the layers to fully set.
- Crust Too Crumbly – Press the crust firmly into the pan before baking.
- Peanut Butter Layer Too Thick – Spread carefully and evenly with an offset spatula.
- Bars Difficult to Cut – Use a warm knife and wipe it clean between slices.
Why This Recipe Works
This dessert works because each layer contributes a complementary texture and flavor. The baked cookie crust provides a sturdy, crunchy base that holds the softer layers above it. The instant chocolate pudding adds a rich, smooth chocolate component that contrasts beautifully with the creamy peanut butter mixture. Cream cheese stabilizes the peanut butter filling, preventing it from becoming too dense while adding slight tanginess. Finally, the whipped topping lightens the overall dessert, while chocolate chips and cookie crumbs introduce extra texture. The chilling step allows the layers to firm up, ensuring neat slices and a balanced bite every time.
Final Thoughts
Chocolate Peanut Butter Dream Bars are the ultimate indulgent dessert for anyone who loves the timeless pairing of chocolate and peanut butter. With their layered textures, creamy filling, and crunchy cookie base, these bars offer both visual appeal and irresistible flavor. Easy to prepare ahead of time and perfect for sharing, they’re a guaranteed crowd-pleaser for parties, holidays, or any moment when a rich sweet treat is exactly what you need.