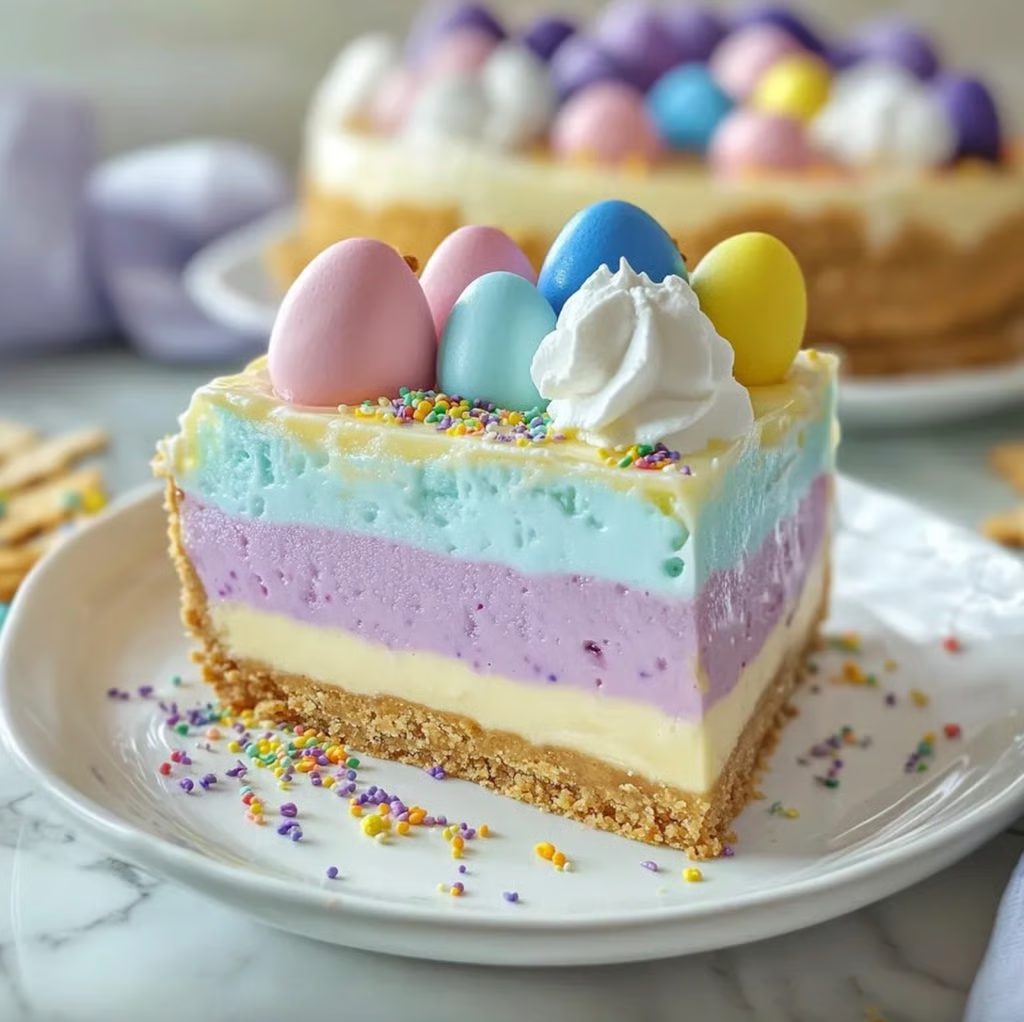
This stunning three-layer no-bake dessert combines the nostalgic appeal of classic Jell-O with the creamy richness of cheesecake in a convenient graham cracker crust. Each pastel layer—lemon, berry blue, and grape—is transformed from simple gelatin into a luxurious mousse-like texture through the addition of cream cheese and whipped topping. The result is a show-stopping Easter centerpiece that’s as delicious as it is beautiful, requiring no baking and minimal hands-on time.
Why You’ll Love This Recipe
No-Bake Convenience – This dessert requires zero oven time, making it perfect for warm spring days or when you need to free up oven space for other Easter dishes.
Make-Ahead Friendly – With a recommended overnight chill time, you can prepare this pie entirely the day before your celebration, reducing day-of stress.
Visually Stunning – The distinct pastel layers create an Instagram-worthy presentation that captures the festive spirit of Easter without requiring advanced decorating skills.
Creamy Texture Upgrade – The cream cheese and whipped topping transform standard Jell-O into a sophisticated mousse-like consistency that appeals to both children and adults.
Customizable Flavors – While the recipe uses traditional Easter colors, you can easily adapt the Jell-O flavors to match any holiday or personal preference.
Budget-Friendly Elegance – Using affordable pantry staples and boxed Jell-O, this impressive dessert delivers maximum visual impact without breaking the bank.
Ingredients You’ll Need
For the Crust
1 ready-to-use 9-inch graham cracker crust – Provides a sweet, crunchy base that complements the creamy layers and eliminates the need for baking or chilling a homemade crust.
For the Jell-O Layers
1 box (3 oz) lemon-flavored Jell-O – Creates the bright yellow bottom layer with a tangy citrus flavor that balances the sweetness of the other components.
1 box (3 oz) berry blue Jell-O – Forms the middle layer with a vibrant blue hue and sweet berry flavor that provides beautiful color contrast.
1 box (3 oz) grape-flavored Jell-O – Tops the pie with a classic purple layer that completes the Easter pastel palette.
3 cups hot water, divided (1 cup per flavor) – Dissolves the Jell-O powder completely to ensure smooth, lump-free layers.
3 cups cold water, divided (1 cup per flavor) – Cools down the dissolved Jell-O mixture and begins the gelling process.
8 ounces cream cheese, at room temperature – Adds richness and creates a mousse-like texture while helping stabilize each layer; room temperature ensures smooth mixing without lumps.
1½ cups whipped topping, thawed – Lightens the texture of each layer and adds airiness to prevent the dessert from becoming too dense.
For Decoration
Whipped cream or whipped topping – Provides a classic finishing touch and adds visual height to the presentation.
Pastel-colored sprinkles – Reinforces the Easter theme with festive colors and adds textural interest.
Mini chocolate eggs – Serves as the signature Easter garnish that makes the dessert instantly recognizable for the holiday.
Step-by-Step Instructions
Prepare the First (Lemon) Layer
Dissolve the lemon Jell-O powder in 1 cup of boiling water, stirring continuously for about 2 minutes until completely dissolved with no granules remaining. Add 1 cup of cold water, stir thoroughly, and let the mixture stand for 5 minutes to cool slightly while remaining liquid.
Create the Lemon Mousse Mixture
In a separate bowl, beat approximately 2.5 ounces (⅓) of the cream cheese with an electric mixer or whisk until completely smooth and fluffy with no lumps. Gradually pour in the slightly cooled lemon Jell-O mixture while continuing to beat, ensuring the ingredients are fully incorporated. Gently fold in ½ cup of whipped topping using a rubber spatula until the mixture is uniform and light.
Set the Foundation Layer
Pour the lemon mousse mixture evenly into the graham cracker crust, using a spatula to smooth the top surface. Refrigerate for approximately 30 minutes, or until the layer feels firm to a gentle touch but not completely solid—this semi-set state is crucial for supporting the next layer without mixing.
Mix the Second (Blue) Layer
While the lemon layer chills, dissolve the berry blue Jell-O in 1 cup of boiling water, stirring until fully dissolved. Add 1 cup of cold water and let it cool for 5 minutes. In a clean bowl, beat another ⅓ of the cream cheese (approximately 2.5 ounces) until smooth, then gradually incorporate the cooled blue Jell-O mixture while beating. Fold in ½ cup of whipped topping until evenly combined.
Layer the Blue Mixture Carefully
Once the lemon layer has firmed up sufficiently, carefully pour the blue mixture over it by holding a spoon close to the surface and letting the liquid slide gently off the back of the spoon—this technique prevents the force of pouring from breaking through the semi-set layer below. Return the pie to the refrigerator for another 30 minutes.
Prepare the Final (Grape) Layer
Dissolve the grape Jell-O in 1 cup of boiling water, add 1 cup of cold water, and allow it to cool for 5 minutes. Beat the remaining cream cheese (approximately 2.5 ounces) until smooth, gradually mix in the cooled grape Jell-O mixture, and fold in the final ½ cup of whipped topping. Ensure the mixture has cooled to room temperature before proceeding to prevent melting the layers beneath.
Complete the Layering Process
When the blue layer is semi-set and firm to the touch, carefully add the grape mixture using the same gentle spooning technique. Smooth the top gently with a spatula, being careful not to press too hard and disturb the layers below. Cover the pie loosely with plastic wrap and refrigerate for at least 4 hours, though overnight chilling is ideal for fully set, clean-cutting layers.
Decorate and Serve
Just before serving, pipe or dollop whipped cream around the edge or across the top of the pie in a decorative pattern. Scatter pastel sprinkles over the whipped cream and strategically place mini chocolate eggs for a festive Easter presentation. For the cleanest slices, dip a sharp knife in hot water, wipe it dry with a towel, and make each cut in one smooth motion, cleaning and reheating the knife between slices.
Recipe Notes & Tips
Layer Setting Time is Critical – Each layer must reach a semi-set consistency before adding the next; if too liquid, layers will blend together, and if too firm, layers may separate when cut. The layer should jiggle slightly but hold a fingerprint when gently touched.
Cream Cheese Temperature Matters – Room temperature cream cheese blends smoothly without lumps; cold cream cheese will create a grainy texture and may not fully incorporate into the Jell-O mixture. Leave it out for 30-45 minutes before starting.
Cooling the Jell-O Prevents Separation – Adding hot Jell-O directly to cream cheese can cause the mixture to curdle or the cream cheese to melt unevenly. The 5-minute cooling period brings the temperature down just enough while keeping the mixture liquid enough to blend.
Gentle Layering Technique Preserves Definition – Pouring directly onto a semi-set layer can create craters or breakthrough spots; using the back of a spoon disperses the liquid gently and evenly across the surface.
Overnight Chilling Yields Best Results – While 4 hours is the minimum, overnight refrigeration ensures all layers are completely firm, making slicing dramatically easier and preventing layers from sliding apart.
Lighter Version Substitutions – Sugar-free Jell-O, low-fat cream cheese (also called Neufchâtel), and light whipped topping can reduce calories by approximately 30-40% while maintaining the essential texture and appearance.
Nutritional Information
Prep Time: 15 minutes (active preparation of mixing and layering)
Chilling Time: 4 hours 30 minutes minimum (30 minutes per layer plus 4 hours final set)
Total Time: 4 hours 45 minutes
Servings: 8 generous slices from one 9-inch pie
Calories: Approximately 250 per serving (based on standard ingredients; will vary with substitutions)
Perfect Pairings
Easter Brunch Spread – Serve alongside savory dishes like honey-glazed ham, deviled eggs, and spring vegetable quiche for a balanced sweet finish to your Easter meal.
Coffee or Tea Service – The light, fruity flavors complement both hot coffee and iced tea, making this pie ideal for afternoon gatherings or post-dinner dessert service.
Fresh Berries – Garnish individual slices with fresh strawberries, blueberries, or raspberries to add natural fruit flavor and a pop of fresh color.
Vanilla Ice Cream – A small scoop of vanilla ice cream on the side provides temperature and texture contrast while complementing the creamy Jell-O layers.
Ideal Occasions
Easter Sunday Celebration – The pastel colors and chocolate egg garnish make this the quintessential Easter dessert that both children and adults will appreciate.
Spring Birthday Parties – The playful colors and no-bake convenience work perfectly for children’s spring birthdays, baby showers, or gender reveal parties with color customization.
Potluck Gatherings – This pie travels well when kept chilled and serves a crowd, making it ideal for church gatherings, school events, or neighborhood potlucks.
Mother’s Day Brunch – The elegant presentation and make-ahead nature allow you to prepare something special without spending Mother’s Day in the kitchen.
Storage & Serving Tips
Refrigerator Storage – Cover the pie tightly with plastic wrap or store in an airtight container in the refrigerator for up to 3 days; the texture may soften slightly after day two but remains perfectly edible.
Freezing Not Recommended – The cream cheese and whipped topping separate and become grainy when frozen and thawed, compromising both texture and appearance.
Pre-Slicing Strategy – If serving to a crowd, consider slicing the pie in advance using the hot knife method, then refrigerating the sliced portions on a plate until serving time for the cleanest presentation.
Temperature Timing – Remove the pie from the refrigerator no more than 10-15 minutes before serving to maintain the firm texture of the layers; extended time at room temperature will cause the layers to soften and potentially slide.
Creative Variations to Try
Tropical Paradise Version – Replace the flavors with pineapple, orange, and strawberry-banana Jell-O for a vibrant tropical twist perfect for summer celebrations.
Red, White, and Blue Patriotic Pie – Use strawberry, berry blue, and leave one layer white (using unflavored gelatin with cream cheese and vanilla extract) for Fourth of July or Memorial Day gatherings.
Halloween Spooky Layers – Create orange and black layers using orange and grape (which appears dark purple, nearly black) Jell-O, topped with Halloween-themed sprinkles and candy.
Chocolate Lovers’ Version – Use a chocolate graham cracker or Oreo crust and replace one Jell-O layer with chocolate pudding mixed with cream cheese for a richer, more decadent variation.
Troubleshooting Common Issues
Layers are blending together – The previous layer wasn’t set enough before adding the next; ensure each layer is firm to the touch and jiggles only slightly before proceeding, and make sure subsequent layers have cooled to room temperature.
Cream cheese is lumpy in the mixture – The cream cheese was too cold when mixing; always bring it to room temperature first, and beat thoroughly until completely smooth before adding any liquid ingredients.
Layers are separating when sliced – The layers were either too firm when the next was added (creating no bond between them) or not chilled long enough at the end; aim for that semi-set sweet spot and ensure the full 4-hour final chill.
The pie is too soft to slice cleanly – Insufficient chilling time or a warm serving environment; return the pie to the refrigerator for another 1-2 hours and ensure your refrigerator is at proper temperature (35-38°F).
Why This Recipe Works
The genius of this Easter Jell-O Pie lies in the transformation of simple gelatin into a sophisticated mousse-like dessert through the careful balance of cream cheese and whipped topping. The cream cheese provides structure, richness, and stability that regular Jell-O lacks, while the whipped topping introduces airiness that prevents the dessert from becoming too dense or heavy. The staggered chilling method creates distinct layers by allowing each layer to develop enough structure to support the weight of the next without fully setting, which would prevent the layers from bonding together. The cold water added to each Jell-O mixture jump-starts the gelling process, while the 5-minute rest period brings the temperature down just enough to prevent the cream cheese from melting or separating. The graham cracker crust provides not just a vessel but also a textural contrast to the creamy layers—its slight saltiness and crunch balance the sweetness and smoothness of the filling. At approximately 250 calories per serving, this dessert is surprisingly moderate considering its impressive appearance and creamy texture.
Final Thoughts
Easter Jell-O Pie represents the perfect intersection of nostalgic simplicity and impressive presentation, transforming childhood favorite flavors into an elegant dessert worthy of your holiday table. The no-bake preparation and make-ahead friendly nature remove stress from your Easter hosting duties, while the stunning layered appearance ensures you’ll receive compliments from every guest. Whether you’re feeding a crowd of children who delight in the bright colors and familiar flavors or adults who appreciate the upgraded mousse-like texture and sophisticated presentation, this pie delivers universal appeal. The recipe is forgiving enough for beginner bakers yet customizable enough to keep experienced dessert makers interested through flavor and color variations. For those watching their intake, the lighter substitutions using sugar-free Jell-O and reduced-fat dairy products allow you to enjoy this festive treat with fewer calories while maintaining the essential character of the dessert. With minimal active preparation time and maximum visual impact, this Easter Jell-O Pie proves that impressive desserts don’t require complicated techniques or expensive ingredients—just a little patience and proper planning.