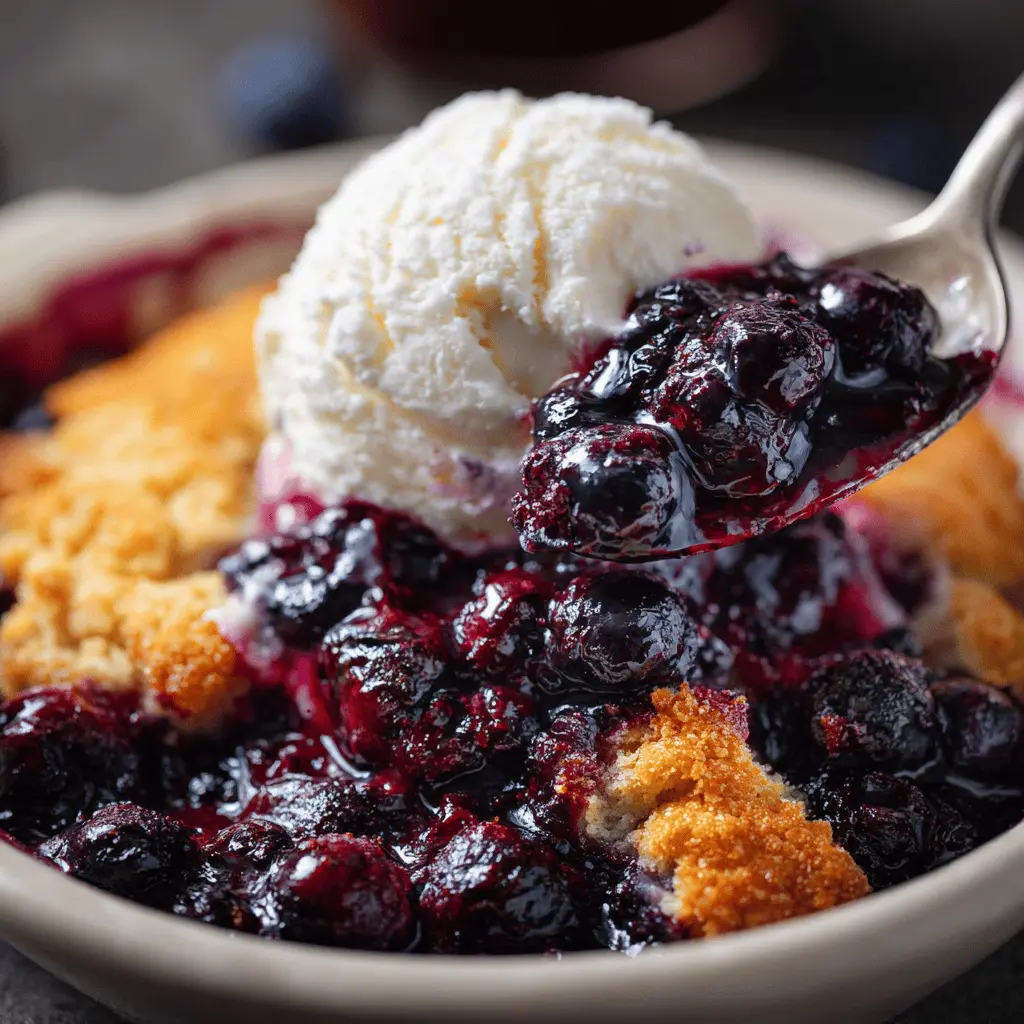
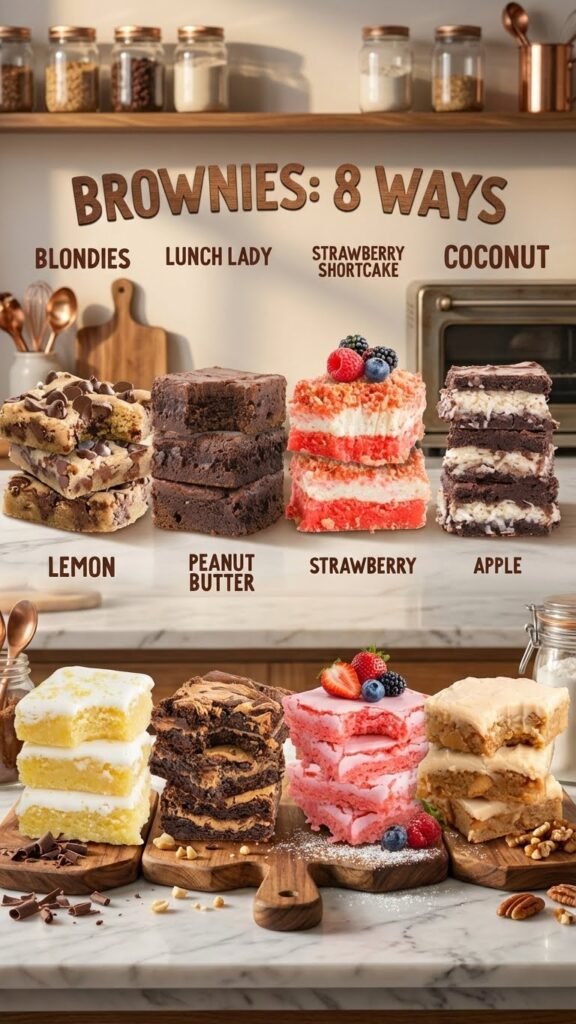
Transform ordinary baking sessions into extraordinary experiences with these eight delicious brownie variations that range from classic chocolate to unexpected flavors like strawberry and apple. Whether you’re preparing treats for cookie exchanges, potluck contributions, gift boxes, or simply craving something sweet for a cozy movie night, this comprehensive collection ensures you’ll never run out of delicious options that bring joy to every occasion.
Classic Blondies
Classic Blondies deliver rich, buttery sweetness with chewy edges and soft centers studded with melty chocolate chips. These golden-brown bars offer all the satisfaction of traditional brownies while showcasing brown sugar’s caramel-like flavor instead of chocolate, creating a beloved alternative that deserves equal recognition.
Why You’ll Love This Recipe
Butterscotch Flavor – Brown sugar creates deep, caramel-like sweetness that distinguishes blondies from chocolate brownies while remaining equally satisfying and crave-worthy.
Chewy Texture – The perfect balance of ingredients creates that ideal chewy consistency with slightly crisp edges that brownie lovers adore.
Chocolate Chip Addition – Semi-sweet chocolate chips provide chocolate elements without overwhelming the butterscotch base, creating perfect flavor harmony.
Quick Preparation – Simple mixing method requires no special equipment or complicated techniques, making these bars accessible for all skill levels.
Versatile Base – This basic blondie recipe accepts countless variations from different chip types to nuts, creating endless customization possibilities.
Crowd-Pleasing Appeal – The familiar yet distinctive flavor appeals to those who might not love intensely chocolate desserts while still satisfying sweet cravings.
Ingredients You’ll Need
Fat and Sugar Base:
½ cup unsalted butter, melted – provides rich, buttery flavor and creates tender texture while contributing to the chewy consistency
½ cup packed light brown sugar – delivers the signature caramel-like sweetness and creates moisture that keeps blondies soft
⅓ cup granulated sugar – adds sweetness and helps create proper texture through its interaction with butter and eggs
Binding and Flavor:
1 large egg, room temperature – provides structure and richness while helping bind ingredients into cohesive bars
1 teaspoon vanilla extract – enhances overall flavor with aromatic sweetness that complements the brown sugar
Dry Ingredients:
1 cup all-purpose flour – creates the structure that holds blondies together while contributing to their tender crumb
¼ teaspoon salt – enhances all flavors and balances the sweetness while strengthening gluten slightly
Mix-Ins:
1 cup semi-sweet chocolate chips – adds chocolate flavor and creates melty pockets throughout the butterscotch base
Step-by-Step Instructions
Prepare Pan and Preheat
Preheat your oven to 350°F (175°C) and line an 8×8-inch baking pan with parchment paper, leaving overhang on two sides for easy removal after baking.
Mix Wet Ingredients
In a large mixing bowl, whisk together the melted butter, packed brown sugar, and granulated sugar until well combined and smooth, then beat in the room temperature egg and vanilla extract until fully incorporated.
Add Dry Ingredients
Stir in the flour and salt, mixing just until no dry streaks remain without overmixing, which would develop too much gluten and create tough rather than tender blondies.
Fold in Chocolate Chips
Gently fold the semi-sweet chocolate chips throughout the batter, distributing them evenly so every piece will contain chocolate.
Bake
Spread the batter evenly in the prepared pan and bake for 20-25 minutes until the edges are set and golden while the center still appears slightly underdone, as it will continue cooking during cooling.
Cool and Cut
Allow the blondies to cool completely in the pan before using the parchment overhang to lift them out, then cut into 16 squares with a sharp knife.
Recipe Notes & Tips
Room Temperature Egg – Using room temperature eggs creates better emulsion with the butter and sugar, resulting in more uniform texture throughout.
Don’t Overbake – Blondies should look slightly underdone in the center when removed from the oven; overbaking creates dry, cake-like texture instead of chewy bars.
Brown Sugar Packing – Pack brown sugar firmly into the measuring cup for accurate measurement that ensures proper sweetness and moisture.
Cooling Completely – Allow full cooling before cutting to prevent crumbling and allow the texture to set properly for clean slicing.
Storage Tips – Store in an airtight container at room temperature for up to 5 days, or freeze for up to 3 months.
Customization Options – Swap chocolate chips for butterscotch, white chocolate, or add ½ cup chopped nuts for varied flavors and textures.
Nutritional Information
Prep Time: 10 minutes
Bake Time: 20-25 minutes
Total Time: 35 minutes (plus cooling)
Yield: 16 blondies
Calories: Approximately 180-200 calories per blondie
Perfect Pairings
Vanilla Ice Cream – Serve warm blondies with cold vanilla ice cream for temperature contrast that creates an irresistible dessert experience.
Cold Milk – Enjoy with tall glasses of cold milk that complement the sweet, buttery flavor and provide refreshing balance.
Coffee or Espresso – Pair with hot coffee where the bitter notes balance the sweetness and enhance the caramel flavors.
Fresh Berries – Serve alongside fresh strawberries or raspberries whose tartness cuts through the richness and adds fresh elements.
Ideal Occasions
Bake Sales – These crowd-pleasing bars sell quickly at fundraisers where their golden appearance and familiar flavor attract customers.
Potluck Contributions – Bring to gatherings knowing they transport easily, slice cleanly, and appeal to diverse palates including those preferring less chocolate.
Lunchbox Treats – Pack individually for school or work lunches where they provide sweet satisfaction that travels well without refrigeration.
Cookie Exchange – Include in holiday cookie swaps as a welcomed alternative to chocolate-based treats that adds variety to assortments.
Storage & Serving Tips
Room Temperature Storage – Keep in an airtight container at room temperature for up to 5 days, maintaining their chewy texture without refrigeration.
Freezing Instructions – Wrap individual blondies or the entire uncut pan in plastic wrap and foil, freezing for up to 3 months.
Reheating Method – Warm individual blondies in the microwave for 10-15 seconds to restore fresh-baked warmth and soften chocolate chips.
Clean Cutting – Use a sharp knife wiped clean between cuts, or use a plastic knife which prevents sticking for cleaner edges.
Creative Variations to Try
White Chocolate Macadamia – Replace chocolate chips with white chocolate chips and add ½ cup chopped macadamia nuts for tropical flavor.
Peanut Butter Blondies – Swirl ⅓ cup peanut butter into the batter before baking for nutty richness and marbled appearance.
Toffee Blondies – Add ½ cup toffee bits along with or instead of chocolate chips for additional caramel flavor and crunch.
Espresso Blondies – Mix 1 tablespoon instant espresso powder into the batter for coffee flavor that enhances the butterscotch notes.
Troubleshooting Common Issues
Blondies too dry – This usually means overbaking; reduce baking time by 2-3 minutes and remove when center still looks slightly underdone.
Edges too dark – Oven temperature may be too high; verify with an oven thermometer and reduce temperature by 25°F if needed.
Gummy texture – Underbaking or too much brown sugar causes this; ensure proper baking time and accurate sugar measurement.
Difficulty removing from pan – Always line with parchment paper with overhang, and ensure complete cooling before attempting to lift out.
Why This Recipe Works
Classic Blondies succeed through the careful balance of brown sugar, butter, and a single egg that creates chewy texture without becoming cake-like. Brown sugar’s molasses content contributes moisture and distinctive caramel flavor while also creating chewiness through its hygroscopic properties that attract and retain moisture. The ratio of butter to flour creates tender crumb by coating flour proteins and limiting gluten development. Using melted rather than creamed butter produces denser, chewier texture compared to the lighter, cake-like results from creaming. The single egg provides just enough structure without making the bars too dry or cakey. Slightly underbaking ensures the centers remain fudgy rather than dry, as the residual heat continues cooking during cooling. At 180-200 calories per blondie, these treats provide reasonable portions that satisfy sweet cravings without excessive indulgence.
Final Thoughts
Classic Blondies prove that brownies’ non-chocolate cousin deserves equal celebration and appreciation in the dessert world. The butterscotch flavor profile offers something different yet familiar that appeals to diverse tastes while maintaining the chewy texture that makes brownies so beloved. The simple preparation and reliable results make blondies perfect for both experienced bakers and beginners building confidence. While certainly sweet treats, the reasonable portion size and the ability to customize with various mix-ins make blondies versatile for different occasions and preferences. These golden bars demonstrate that sometimes stepping away from chocolate leads to equally delicious discoveries.
Lunch Lady Brownies
Lunch Lady Brownies recreate those legendary cafeteria brownies with their ultra-fudgy texture, rich chocolate flavor, and signature chocolate frosting that defined childhood treats. These nostalgic brownies deliver dense, intensely chocolatey satisfaction topped with smooth, sweet frosting that takes them from good to unforgettable.
Why You’ll Love This Recipe
Nostalgic Flavor – These brownies taste exactly like the cafeteria classics that defined school lunch desserts, bringing back cherished childhood memories with every bite.
Ultra-Fudgy Texture – The high butter and cocoa content creates incredibly dense, moist brownies that are never dry or cake-like.
Chocolate Frosting – The layer of sweet chocolate frosting transforms simple brownies into something truly special and crave-worthy.
Feeds a Crowd – This recipe makes a large 9×13-inch pan, perfect for feeding families, parties, or potlucks without needing to double batches.
Simple Ingredients – Basic pantry staples create these legendary brownies without requiring specialty chocolate or expensive ingredients.
Make-Ahead Friendly – These brownies actually improve after a day as flavors meld and texture becomes even fudgier, making advance preparation ideal.
Ingredients You’ll Need
Brownie Base:
1 cup melted butter – provides rich flavor and creates the ultra-fudgy texture through high fat content
½ cup unsweetened cocoa powder – delivers intense chocolate flavor without adding extra sweetness or fat
2 cups all-purpose flour – creates structure that holds these dense brownies together
2 cups granulated sugar – adds sweetness and contributes to the fudgy texture through moisture retention
½ teaspoon salt – enhances chocolate flavor and balances the sweetness
4 large eggs – provides structure, richness, and helps create dense texture
3 tablespoons vanilla extract – enhances chocolate flavor with aromatic depth
Chocolate Frosting:
¼ cup melted butter – creates smooth, spreadable frosting base
¼ cup milk – thins the frosting to proper consistency for easy spreading
3 cups powdered sugar – provides sweetness and creates proper frosting texture
¼ cup unsweetened cocoa powder – delivers chocolate flavor that complements the brownie base
1 tablespoon vanilla extract – enhances overall flavor and adds aromatic sweetness
Step-by-Step Instructions
Prepare and Mix Brownies
Preheat oven to 350°F (175°C) and grease a 9×13-inch baking pan. In a large bowl, whisk together melted butter and cocoa powder until smooth, then stir in flour, sugar, and salt until combined. Beat in eggs one at a time, then add vanilla extract.
Bake Brownies
Pour batter into prepared pan, spreading evenly, and bake for 25-30 minutes until a toothpick inserted near the center comes out with a few moist crumbs but not wet batter.
Cool Completely
Allow brownies to cool completely in the pan before frosting, as warm brownies will melt the frosting and create a messy result.
Make Frosting
While brownies cool, whisk together melted butter, milk, powdered sugar, cocoa powder, and vanilla extract in a medium bowl until smooth and creamy with no lumps.
Frost and Serve
Spread frosting evenly over cooled brownies, then let the frosting set for 15-20 minutes before cutting into squares and serving.
Recipe Notes & Tips
Don’t Overbake – Remove brownies when they still appear slightly underdone in the center, as they continue cooking during cooling and overbaking creates dry texture.
Complete Cooling Essential – Frost only completely cooled brownies to prevent melting; patience here ensures beautiful, professional results.
Frosting Consistency – Add milk gradually to achieve spreadable consistency; too thin means adding more powdered sugar, too thick requires more milk.
Cutting Clean Squares – Use a sharp knife wiped clean between cuts, or run under hot water and dry between cuts for the cleanest edges.
Storage Method – Cover tightly and store at room temperature for up to 4 days, or refrigerate for up to 1 week for longer storage.
Advance Preparation – Make these a day ahead for best flavor and texture as they become even fudgier and flavors intensify overnight.
Nutritional Information
Prep Time: 15 minutes
Bake Time: 25-30 minutes
Total Time: 45 minutes (plus cooling and frosting time)
Yield: 24 brownies
Calories: Approximately 250-280 calories per brownie (including frosting)
Perfect Pairings
Cold Milk – Serve with ice-cold milk that cuts through the richness and provides nostalgic school lunch pairing.
Vanilla Ice Cream – Top warm brownies with vanilla ice cream for an elevated dessert that’s perfect for special occasions.
Fresh Coffee – Enjoy with hot coffee where bitter notes balance sweetness and enhance chocolate flavors.
Fresh Strawberries – Serve alongside fresh berries whose tartness provides refreshing contrast to the rich chocolate.
Ideal Occasions
School Events – Bring to school parties, bake sales, or teacher appreciation events where the cafeteria connection creates instant nostalgia.
Potluck Dinners – Contribute to gatherings knowing the large pan serves crowds and the familiar flavor appeals universally.
Birthday Parties – Serve at celebrations where the frosted brownies satisfy chocolate lovers without the formality of cake.
Family Reunions – Share at family gatherings where multiple generations appreciate the nostalgic flavor and generous portions.
Storage & Serving Tips
Room Temperature Storage – Store covered at room temperature for up to 4 days in cool weather, ensuring the frosting doesn’t melt.
Refrigerator Storage – Refrigerate in hot weather or for longer storage up to 1 week, bringing to room temperature before serving for best texture.
Freezing Instructions – Freeze unfrosted brownies wrapped tightly for up to 3 months, thawing and frosting before serving for freshest results.
Serving Temperature – These brownies taste excellent at room temperature, slightly warm, or even cold from the refrigerator for different textural experiences.
Creative Variations to Try
Peanut Butter Swirl – Drop spoonfuls of peanut butter onto the batter before baking and swirl with a knife for marbled effect.
Mint Frosting – Add ½ teaspoon peppermint extract to the frosting for mint-chocolate flavor combination.
Espresso Enhancement – Add 1 tablespoon instant espresso powder to the batter to intensify chocolate flavor without adding coffee taste.
Cream Cheese Frosting – Replace chocolate frosting with cream cheese frosting for tangy contrast against the rich chocolate base.
Troubleshooting Common Issues
Dry brownies – Overbaking is the culprit; reduce time by 3-5 minutes and remove when center still appears slightly underdone.
Frosting too thin – Add more powdered sugar gradually until you achieve spreadable consistency that holds its shape.
Brownies sticking to pan – Always grease thoroughly or line with parchment paper for easy removal and clean presentation.
Uneven baking – Rotate pan halfway through baking time to ensure even heat distribution and uniform doneness.
Why This Recipe Works
Lunch Lady Brownies succeed through their high butter-to-flour ratio that creates ultra-fudgy texture rather than cake-like consistency. The combination of melted butter and cocoa powder forms a chocolate base that’s intensely flavored without being bitter. Using a full cup of butter for a 9×13 pan creates rich moisture that prevents dryness even with longer baking. Four eggs provide structure without making brownies cakey, as the high fat content keeps texture dense. The large amount of vanilla extract enhances chocolate flavor through complementary aromatic compounds. The frosting’s combination of butter, cocoa, and powdered sugar creates perfect spreadable consistency that sets firm but never becomes hard or brittle. At 250-280 calories per brownie, these are certainly indulgent treats best enjoyed occasionally as special desserts rather than everyday snacks.
Final Thoughts
Lunch Lady Brownies prove that sometimes the most beloved recipes are those that transport us back to simpler times through taste and texture. The nostalgia factor combined with genuinely delicious flavor makes these brownies special beyond just their chocolate richness. The frosting elevates them from simple brownies to memorable treats that feel like special occasions. While certainly rich and indulgent, the large yield means one batch serves many people, making the caloric splurge worthwhile for gatherings. These brownies demonstrate that sometimes cafeteria ladies knew exactly what they were doing, creating recipes that generations remember fondly decades later.
Strawberry Shortcake Brownies
Strawberry Shortcake Brownies transform cake mix into pink, strawberry-flavored bars topped with cream cheese frosting and Golden Oreo crumble. These vibrant, fruity treats offer something completely different from traditional chocolate brownies while maintaining the dense, chewy texture that makes brownies so beloved.
Why You’ll Love This Recipe
Unique Flavor Profile – Strawberry cake creates a refreshing alternative to chocolate that’s perfect for those who prefer fruity over chocolate desserts.
Beautiful Pink Color – The vibrant pink hue makes these brownies visually striking and perfect for celebrations, showers, or themed parties.
Cream Cheese Frosting – Tangy cream cheese frosting balances the sweet strawberry base perfectly while adding richness.
Golden Oreo Crumble – The crunchy topping adds textural contrast and additional flavor that elevates these beyond simple bars.
Cake Mix Shortcut – Using cake mix simplifies preparation while still producing homemade-quality results that taste impressive.
Perfect for Spring – These strawberry brownies feel seasonal and fresh, ideal for spring and summer gatherings when berries are in season.
Ingredients You’ll Need
Brownie Base:
1 box strawberry cake mix – provides strawberry flavor, structure, and pink color in convenient pre-mixed form
½ cup salted butter, melted – adds richness and creates dense, brownie-like texture instead of cake
2 large eggs – binds ingredients and creates chewy consistency
2 tablespoons strawberry gelatin – intensifies strawberry flavor and enhances pink color
Cream Cheese Frosting:
8-ounce block cream cheese, softened – creates tangy, rich frosting base that balances sweetness
¼ cup salted butter, softened – adds richness and helps create smooth, spreadable consistency
1 teaspoon vanilla extract – enhances overall flavor with aromatic sweetness
½ cup powdered sugar – sweetens and creates proper frosting texture
1-2 tablespoons heavy cream – adjusts consistency to achieve perfect spreadability
Strawberry Shortcake Crumble:
20 Golden Oreos (about ½ standard package) – provides crunchy topping with vanilla flavor
4 tablespoons strawberry gelatin (remaining amount) – adds strawberry flavor and pink color to crumble
4 tablespoons salted butter, melted – binds crumble ingredients together
Step-by-Step Instructions
Prepare Brownie Base
Preheat oven to 350°F (175°C) and line a 9×13-inch pan with parchment paper. Mix cake mix, melted butter, eggs, and 2 tablespoons strawberry gelatin until combined, then spread evenly in prepared pan.
Bake
Bake for 18-22 minutes until edges are set and center appears slightly underdone, as overbaking creates dry rather than chewy texture.
Make Frosting
While brownies bake, beat softened cream cheese and butter together until fluffy, then mix in vanilla, powdered sugar, and enough heavy cream to achieve spreadable consistency.
Prepare Crumble
Crush Golden Oreos into fine crumbs in a food processor or by placing in a sealed bag and crushing with a rolling pin. Mix with remaining strawberry gelatin and melted butter until mixture resembles wet sand.
Assemble
Once brownies cool completely, spread cream cheese frosting evenly over top, then sprinkle Golden Oreo crumble over the frosting, pressing gently to adhere.
Chill and Serve
Refrigerate for at least 30 minutes to set frosting before cutting into squares and serving.
Recipe Notes & Tips
Cake Mix Brand – Different brands vary slightly; if batter seems too thick, add 1-2 tablespoons water to achieve proper consistency.
Room Temperature Ingredients – Ensure cream cheese and butter are fully softened for smooth frosting without lumps.
Gelatin Distribution – Mix gelatin thoroughly into both brownie base and crumble to ensure even flavor and color distribution.
Frosting Consistency – Add heavy cream gradually until frosting spreads easily without being runny or tearing the brownie surface.
Oreo Processing – Crush Oreos finely for uniform crumble that distributes evenly rather than leaving large chunks.
Chilling Time – The 30-minute chill sets the frosting and makes cutting much cleaner with less mess.
Nutritional Information
Prep Time: 15 minutes
Bake Time: 18-22 minutes
Total Time: 35-40 minutes (plus cooling and chilling)
Yield: 24 brownies
Calories: Approximately 220-250 calories per brownie
Perfect Pairings
Fresh Strawberries – Serve with fresh sliced strawberries that reinforce the strawberry flavor and add fresh, juicy contrast.
Vanilla Ice Cream – Top with vanilla ice cream for a strawberry shortcake-inspired dessert that’s even more indulgent.
Lemonade – Pair with cold lemonade where the tart citrus complements the sweet strawberry perfectly.
Whipped Cream – Add a dollop of freshly whipped cream for additional richness and traditional shortcake association.
Ideal Occasions
Baby Showers – The pink color makes these perfect for baby girl showers where the color scheme matches celebration themes.
Spring Celebrations – Serve at Easter, Mother’s Day, or spring gatherings where the fruity flavor feels seasonally appropriate.
Birthday Parties – Bring to celebrations for strawberry lovers who prefer fruity desserts over traditional chocolate options.
Bridal Showers – The elegant pink appearance and sophisticated flavor make these suitable for bridal celebrations and tea parties.
Storage & Serving Tips
Refrigerator Storage – Store covered in the refrigerator for up to 5 days, as the cream cheese frosting requires cold storage.
Serving Temperature – These brownies taste delicious cold, at room temperature, or slightly warm based on personal preference.
Freezing Instructions – Freeze unfrosted brownies wrapped tightly for up to 3 months, thawing and frosting before serving.
Clean Cutting – Use a sharp knife wiped clean between cuts, and chill thoroughly before cutting for the cleanest edges.
Creative Variations to Try
Lemon Version – Use lemon cake mix and lemon gelatin instead of strawberry for tangy, citrus-flavored brownies.
Raspberry Twist – Substitute raspberry cake mix and gelatin for different berry flavor with similar pink color.
Chocolate Chip Addition – Fold white chocolate chips into the batter for added sweetness and textural contrast.
Vanilla Oreo Crumble – Use regular Oreos instead of Golden for chocolate cookie crumble if you prefer chocolate elements.
Troubleshooting Common Issues
Brownies too dry – Reduce baking time by 2-3 minutes, as cake mix brownies overbake more easily than from-scratch versions.
Frosting too soft – Add more powdered sugar to thicken, or refrigerate longer to firm up before serving.
Crumble won’t stick – Press more firmly into frosting, or add slightly more melted butter to help bind the crumbs together.
Pink color too pale – Use additional strawberry gelatin for more intense color and stronger strawberry flavor.
Why This Recipe Works
Strawberry Shortcake Brownies succeed by transforming cake mix into denser, chewier texture through reduced liquid and added eggs. Using melted butter instead of oil creates richer flavor while the absence of additional liquid makes the texture more brownie-like than cakey. Strawberry gelatin intensifies both flavor and color beyond what cake mix alone provides. The cream cheese frosting adds tangy richness that balances the sweet strawberry base while contributing moisture. The Golden Oreo crumble provides crunchy contrast against the soft brownie and creamy frosting, creating multi-dimensional eating experience. At 220-250 calories per brownie, these treats offer reasonable portions that satisfy sweet cravings while providing something different from standard chocolate desserts.
Final Thoughts
Strawberry Shortcake Brownies demonstrate that brownies don’t have to be chocolate to be delicious and satisfying. The fruity flavor profile and pink color create visual and taste appeal that stands out on dessert tables. The combination of convenience from cake mix with homemade frosting and creative topping creates impressive results without extensive from-scratch baking. While certainly sweet and indulgent, these brownies offer something refreshing and different that makes them valuable for expanding your dessert repertoire beyond chocolate options. These pink, fruity bars prove that thinking outside the traditional chocolate box leads to delightful discoveries.
Coconut Brownies
Coconut Brownies layer rich chocolate brownie base with sweet coconut topping that creates a homemade Mounds bar effect. These decadent treats combine fudgy chocolate with chewy coconut for a flavor combination that transports you to tropical paradise while satisfying chocolate cravings.
Why You’ll Love This Recipe
Two-Layer Delight – The combination of chocolate brownie base with coconut topping creates textural and flavor contrast that makes every bite interesting.
Mounds Bar Inspiration – These brownies taste like homemade candy bars, delivering that beloved chocolate-coconut combination in brownie form.
Rich and Indulgent – Sweetened condensed milk in the coconut layer creates intense sweetness and moisture that makes these truly decadent.
Impressive Presentation – The distinct layers look professional and impressive, making these suitable for special occasions and gift-giving.
Coconut Lover’s Dream – For those who adore coconut, these brownies deliver generous amounts of shredded coconut in every bite.
Perfect Texture Contrast – Fudgy chocolate base meets chewy coconut topping for a multi-dimensional eating experience.
Ingredients You’ll Need
Chocolate Brownie Base:
1 cup all-purpose flour, plus 1 teaspoon – provides structure for the dense, fudgy brownie layer
½ cup cocoa powder – delivers intense chocolate flavor that complements the sweet coconut
¼ teaspoon salt – enhances chocolate flavor and balances the sweetness
1½ cups granulated sugar – sweetens the brownie layer and contributes to fudgy texture
¾ cup salted sweet cream butter, melted and cooled – creates richness and fudgy consistency
2 large eggs – binds ingredients and provides structure
2 teaspoons vanilla extract – enhances chocolate flavor with aromatic depth
½ cup mini semi-sweet chocolate chips – adds extra chocolate pockets throughout the base
Coconut Topping:
2½ cups sweetened coconut flakes – creates the signature coconut layer with chewy texture
⅔ cup sweetened condensed milk – binds coconut together while adding intense sweetness and moisture
1 teaspoon vanilla extract – enhances overall flavor
¼ teaspoon salt – balances sweetness and enhances flavors
Step-by-Step Instructions
Prepare Brownie Base
Preheat oven to 350°F (175°C) and line a 9×9-inch pan with parchment paper. Whisk together flour, cocoa powder, salt, and sugar, then stir in melted cooled butter, eggs, and vanilla until just combined. Fold in mini chocolate chips.
Bake Brownie Layer
Spread brownie batter evenly in prepared pan and bake for 20-25 minutes until edges are set but center still appears slightly underdone.
Make Coconut Topping
While brownies bake, combine coconut flakes, sweetened condensed milk, vanilla extract, and salt in a bowl, stirring until all coconut is coated with the condensed milk mixture.
Add Coconut Layer
Remove brownies from oven and immediately spread coconut mixture evenly over the hot brownie layer, pressing gently to help it adhere.
Finish Baking
Return pan to oven and bake for an additional 15-18 minutes until the coconut topping turns golden brown on top.
Cool and Cut
Allow brownies to cool completely in the pan before using the parchment to lift them out, then cut into 16 squares with a sharp knife.
Recipe Notes & Tips
Butter Temperature – Allow melted butter to cool slightly before adding to prevent cooking the eggs when mixed together.
Coconut Type – Use sweetened coconut flakes rather than unsweetened for proper sweetness and texture in the topping layer.
Even Distribution – Spread coconut topping to the edges to ensure every brownie piece gets adequate coconut coverage.
Golden Topping – Watch the coconut layer carefully during the second bake to achieve golden brown without burning.
Complete Cooling – These brownies cut much cleaner when completely cool, so patience pays off with neater presentation.
Storage Method – Store in an airtight container at room temperature for up to 5 days, or refrigerate for longer storage.
Nutritional Information
Prep Time: 15 minutes
Bake Time: 35-45 minutes (in two stages)
Total Time: 50-60 minutes (plus cooling)
Yield: 16 brownies
Calories: Approximately 320-350 calories per brownie
Perfect Pairings
Vanilla Ice Cream – Serve warm brownies with cold vanilla ice cream that melts slightly and creates a creamy contrast to the chewy coconut.
Dark Roast Coffee – Pair with strong, dark coffee where bitter notes balance the intense sweetness and enhance chocolate flavors.
Fresh Pineapple – Serve alongside fresh pineapple chunks for tropical fruit flavor that complements the coconut perfectly.
Hot Fudge Sauce – Drizzle with warm hot fudge for extra chocolate indulgence that takes these over the top.
Ideal Occasions
Tropical Themed Parties – Serve at luau or beach-themed celebrations where the coconut creates appropriate tropical atmosphere.
Bake Sales – The impressive layered appearance and unique flavor combination make these stand out and sell quickly.
Gift Boxes – Include in homemade gift assortments for coconut lovers who will appreciate the thoughtful flavor choice.
Special Celebrations – Bring to gatherings when you want to offer something different from standard chocolate brownies.
Storage & Serving Tips
Room Temperature Storage – Keep in an airtight container at room temperature for up to 5 days in moderate climates.
Refrigerator Storage – Store in the refrigerator in hot weather or for up to 1 week, bringing to room temperature before serving.
Freezing Instructions – Freeze individually wrapped brownies for up to 3 months, thawing at room temperature before enjoying.
Cutting Tips – Use a sharp knife dipped in hot water and wiped dry between cuts for the cleanest edges through both layers.
Creative Variations to Try
Dark Chocolate Base – Replace cocoa powder with dark cocoa or add espresso powder for more intense, sophisticated chocolate flavor.
Almond Joy Brownies – Add ½ cup chopped almonds to the coconut layer for Almond Joy candy bar inspiration.
Chocolate Drizzle – After cooling, drizzle melted chocolate over the coconut layer for additional chocolate and visual appeal.
Toasted Coconut – Toast the coconut flakes before mixing with condensed milk for nuttier, more complex flavor.
Troubleshooting Common Issues
Coconut layer sliding off – Ensure brownies are hot when adding coconut, and press firmly to help it adhere to the base.
Coconut burning – Cover with foil during the last 5 minutes if the coconut browns too quickly before the brownie sets.
Brownie layer too dry – Don’t overbake the first layer; remove when center still appears slightly underdone as it continues cooking.
Difficulty cutting – Chill brownies briefly before cutting for cleaner slices, and wipe knife between each cut.
Why This Recipe Works
Coconut Brownies succeed through the strategic two-stage baking that allows each layer to develop properly. Baking the brownie base first creates fudgy texture without interference from the coconut topping. Adding the coconut mixture to hot brownies helps it adhere through slight melting at the contact point. Sweetened condensed milk acts as both sweetener and binder for the coconut, creating chewy texture that contrasts with the fudgy base. The high sugar content in condensed milk caramelizes slightly during baking, developing deeper flavor and golden color. Mini chocolate chips throughout the base reinforce chocolate flavor and create pockets of melty chocolate. The combination of textures—fudgy chocolate, chewy coconut, and semi-melted chocolate chips—creates complex eating experience. At 320-350 calories per brownie, these are certainly indulgent treats best reserved for special occasions when you want something truly decadent.
Final Thoughts
Coconut Brownies demonstrate how layering different flavors and textures creates something greater than the sum of its parts. The chocolate-coconut combination has proven timeless appeal that translates perfectly to brownie format. While more involved than single-layer brownies, the impressive results justify the extra steps when you want to wow guests or treat yourself to something special. These brownies prove that classic candy bar flavors can inspire creative baking that delivers nostalgia and sophistication simultaneously.
Lemon Brownies
Lemon Brownies trade chocolate for bright citrus flavor, creating tender, cake-like bars with intense lemon taste topped with sweet-tart glaze. These sunny yellow treats offer refreshing alternative to chocolate that’s perfect for spring, summer, or anytime you crave something light and citrusy.
Why You’ll Love This Recipe
Bright Citrus Flavor – Fresh lemon juice and zest create authentic, bright flavor that tastes like sunshine in every bite.
Refreshing Alternative – These provide welcome relief from chocolate for those preferring fruity, tangy desserts over rich chocolate.
Light Texture – The cake-like crumb feels lighter than fudgy brownies, making these appropriate for warm weather when heavy desserts feel too rich.
Beautiful Yellow Color – The vibrant yellow hue looks cheerful and appealing, perfect for spring celebrations or garden parties.
Sweet-Tart Balance – The combination of sweet brownie base with tangy lemon glaze creates perfect flavor harmony.
Make-Ahead Friendly – These brownies actually improve after sitting as the glaze soaks slightly into the bars, intensifying lemon flavor.
Ingredients You’ll Need
Lemon Brownie Base:
½ cup vegetable oil – creates moist, tender texture without the heaviness of butter
1 cup granulated sugar – sweetens the bars and helps create proper cake-like texture
1 teaspoon lemon extract – intensifies lemon flavor beyond what fresh juice alone provides
1 teaspoon vanilla extract – enhances overall flavor and adds aromatic depth
1 lemon zest (about 2 teaspoons) – provides essential oils that deliver intense lemon flavor
2 tablespoons fresh lemon juice – adds bright, authentic citrus taste and acidity
2 large eggs, room temperature – provides structure and richness
1 egg yolk, room temperature – adds extra richness and creates tender crumb
1 cup all-purpose flour – creates structure while keeping texture tender
½ teaspoon salt – enhances lemon flavor and balances sweetness
½ teaspoon baking powder – provides lift that creates light, cake-like texture
Lemon Glaze:
1 cup powdered sugar – sweetens the glaze and creates proper consistency
2 tablespoons water – thins the glaze to pourable consistency
1 teaspoon lemon extract – reinforces lemon flavor in the topping
1 teaspoon lemon juice (or more water) – adds tartness and authentic citrus taste
1-2 teaspoons lemon zest (optional garnish) – provides visual appeal and extra lemon aroma
Step-by-Step Instructions
Prepare Pan and Mix Wet Ingredients
Preheat oven to 350°F (175°C) and line an 8×8-inch pan with parchment paper. Whisk together oil, sugar, lemon extract, vanilla extract, lemon zest, and lemon juice until combined.
Add Eggs
Beat in the eggs and egg yolk one at a time, whisking well after each addition until the mixture is smooth and slightly thickened.
Combine Dry Ingredients
In a separate bowl, whisk together flour, salt, and baking powder, then gently fold into the wet ingredients just until no dry streaks remain.
Bake
Pour batter into prepared pan, spreading evenly, and bake for 23-28 minutes until edges are golden and a toothpick inserted in the center comes out with just a few moist crumbs.
Make Glaze
While brownies bake, whisk together powdered sugar, water, lemon extract, and lemon juice until smooth and pourable.
Glaze and Garnish
Allow brownies to cool for 10 minutes, then pour glaze evenly over the warm brownies, spreading to edges. Sprinkle with additional lemon zest if desired, then let cool completely before cutting.
Recipe Notes & Tips
Fresh Lemon Essential – Use fresh lemon juice and zest for best flavor; bottled juice lacks the brightness of fresh-squeezed.
Room Temperature Eggs – Bring eggs to room temperature for better incorporation and more uniform texture throughout.
Don’t Overbake – Remove when center still appears slightly underdone, as these brownies continue cooking during cooling.
Glaze on Warm Brownies – Apply glaze while brownies are still slightly warm so it soaks in partially, creating intense lemon flavor.
Zest Before Juicing – Always zest the lemon before cutting and juicing for easier zesting and maximum yield.
Storage Instructions – Store covered at room temperature for up to 4 days, or refrigerate for up to 1 week.
Nutritional Information
Prep Time: 15 minutes
Bake Time: 23-28 minutes
Total Time: 40-45 minutes (plus cooling)
Yield: 16 brownies
Calories: Approximately 140-160 calories per brownie
Perfect Pairings
Hot Tea – Serve with hot tea, especially Earl Grey or chamomile, where the citrus complements the lemon flavor.
Fresh Berries – Pair with fresh raspberries or blueberries whose tartness and sweetness enhance the lemon.
Whipped Cream – Top with lightly sweetened whipped cream for richness that balances the bright citrus.
Iced Lemonade – Enjoy with cold lemonade for a double-lemon experience that’s perfect for summer.
Ideal Occasions
Spring Celebrations – Serve at Easter, Mother’s Day, or spring gatherings where the bright flavor feels seasonally appropriate.
Summer Picnics – Bring to outdoor events where the refreshing flavor and light texture suit warm weather perfectly.
Baby Showers – The yellow color makes these suitable for gender-neutral celebrations or specifically themed events.
Afternoon Tea – Include at tea parties where the elegant lemon flavor and light texture match the sophisticated atmosphere.
Storage & Serving Tips
Room Temperature Storage – Keep covered at room temperature for up to 4 days, though glaze may become slightly sticky in humidity.
Refrigerator Storage – Store in the refrigerator for up to 1 week, bringing to room temperature before serving for best flavor.
Freezing Instructions – Freeze unglazed brownies wrapped tightly for up to 3 months, thawing and glazing before serving.
Clean Cutting – Use a sharp knife wiped clean between cuts for neat edges through the glazed top.
Creative Variations to Try
Lemon-Blueberry – Fold ¾ cup fresh blueberries into the batter for fruity pockets throughout.
Lemon-Lavender – Add 1 teaspoon dried culinary lavender to the batter for sophisticated floral notes.
Cream Cheese Frosting – Replace lemon glaze with cream cheese frosting for richer, tangier topping.
Lemon-Poppy Seed – Stir 2 tablespoons poppy seeds into the batter for classic flavor combination and visual interest.
Troubleshooting Common Issues
Brownies too dry – Reduce baking time by 2-3 minutes; these should be moist and tender, never dry or crumbly.
Glaze too thick – Add water or lemon juice one teaspoon at a time until glaze reaches pourable consistency.
Lacking lemon flavor – Increase lemon zest and don’t skip the lemon extract, which intensifies the citrus taste significantly.
Glaze not setting – These brownies have a softer glaze that doesn’t harden completely; this is normal and correct.
Why This Recipe Works
Lemon Brownies succeed by balancing fat, sugar, eggs, and flour to create tender texture while incorporating enough lemon for assertive flavor. Using oil instead of butter creates moister texture with longer shelf life. The combination of whole eggs and an extra yolk adds richness without making the bars heavy. Fresh lemon zest contains essential oils that provide more intense flavor than juice alone. Lemon extract reinforces the citrus taste, ensuring it doesn’t get lost among sweet and fat flavors. Baking powder creates lift that makes these more cake-like than fudgy, which suits the bright lemon flavor better than dense texture would. The glaze applied to warm brownies partially soaks in, creating layers of lemon flavor rather than just surface sweetness. At 140-160 calories per brownie, these provide lighter alternative to chocolate brownies while still delivering satisfying sweetness.
Final Thoughts
Lemon Brownies prove that the brownie format adapts beautifully to non-chocolate flavors when executed properly. The bright, sunny flavor provides refreshing contrast to typical chocolate desserts while maintaining the convenient bar-cookie format. These brownies demonstrate that sometimes the best desserts are those that offer something different and unexpected, creating memorable experiences through departure from the expected. While simpler than layered varieties, these lemon bars deliver big flavor that makes them valuable additions to any baker’s repertoire.
Peanut Butter Brownies
Peanut Butter Brownies swirl creamy peanut butter throughout fudgy chocolate brownies, creating the beloved chocolate-peanut butter combination that rivals candy bars. These rich, decadent bars deliver both flavors in perfect proportion with gorgeous marbled appearance that looks as impressive as it tastes.
Why You’ll Love This Recipe
Classic Flavor Combo – Chocolate and peanut butter create one of the most beloved taste combinations that satisfies on every level.
Fudgy Texture – These brownies deliver ultra-fudgy, dense texture that serious brownie lovers crave and appreciate.
Beautiful Marbling – The swirled peanut butter creates stunning visual appeal that makes these look professionally made.
Extra Peanut Butter – Using peanut butter both in the batter and as swirls ensures every bite has nutty flavor.
Chocolate Chip Addition – Semi-sweet chips throughout add extra chocolate pockets that intensify the chocolate experience.
Satisfying Richness – The combination of chocolate, peanut butter, and butter creates deeply satisfying richness.
Ingredients You’ll Need
Brownie Base:
¾ cup all-purpose flour, spooned and leveled – provides structure while keeping texture fudgy rather than cake-like
½ cup unsweetened cocoa powder – delivers intense chocolate flavor that stands up to the peanut butter
½ teaspoon baking powder – creates slight lift without making brownies cakey
½ cup salted butter, melted and cooled – adds richness and creates fudgy consistency
¾ cup granulated sugar – sweetens and contributes to fudgy texture
¾ cup light brown sugar – adds caramel notes and extra moisture for chewiness
2 extra large eggs, room temperature – provides structure and richness
2 teaspoons pure vanilla extract – enhances both chocolate and peanut butter flavors
½ teaspoon kosher salt – balances sweetness and enhances flavors
½ cup chocolate chips (milk, semi-sweet, or dark) – adds extra chocolate throughout
Peanut Butter Component:
1 cup creamy peanut butter, divided – use ⅔ cup in batter and ⅓ cup for swirls on top
Step-by-Step Instructions
Prepare and Mix Dry Ingredients
Preheat oven to 350°F (175°C) and line an 8×8-inch pan with parchment paper. Whisk together flour, cocoa powder, baking powder, and salt.
Combine Wet Ingredients
In a large bowl, whisk together melted cooled butter, granulated sugar, and brown sugar until smooth. Beat in eggs one at a time, then stir in vanilla extract and ⅔ cup peanut butter until combined.
Combine and Add Chips
Fold dry ingredients into wet ingredients just until no dry streaks remain, then fold in chocolate chips.
Create Swirls
Spread batter evenly in prepared pan. Drop spoonfuls of the remaining ⅓ cup peanut butter over the surface, then use a knife to swirl it through the batter, creating marbled pattern.
Bake
Bake for 30-35 minutes until edges are set and center still appears slightly underdone, as these brownies should be fudgy.
Cool and Cut
Allow to cool completely in the pan before lifting out with parchment and cutting into 16 squares.
Recipe Notes & Tips
Peanut Butter Type – Use regular creamy peanut butter like Jif or Skippy, not natural varieties which are too oily for proper texture.
Room Temperature Eggs – Bring eggs to room temperature for better incorporation and more uniform texture.
Don’t Overmix – Stir just until combined to maintain fudgy texture; overmixing develops gluten and creates cakey results.
Swirling Technique – Use a knife to create figure-eight patterns or zigzags without over-swirling, which muddies the marbling.
Cooling Completely – These brownies cut much cleaner when completely cool, so resist cutting while warm.
Storage Method – Store in an airtight container at room temperature for up to 5 days.
Nutritional Information
Prep Time: 15 minutes
Bake Time: 30-35 minutes
Total Time: 45-50 minutes (plus cooling)
Yield: 16 brownies
Calories: Approximately 280-320 calories per brownie
Perfect Pairings
Cold Milk – Serve with ice-cold milk that complements both the chocolate and peanut butter perfectly.
Vanilla Ice Cream – Top warm brownies with vanilla ice cream for temperature contrast and additional richness.
Hot Fudge – Drizzle with warm hot fudge sauce for extra chocolate indulgence.
Sliced Bananas – Serve alongside banana slices for Elvis-inspired flavor combination.
Ideal Occasions
Lunchbox Treats – Pack individually for school or work lunches where the peanut butter adds protein to the sweet treat.
Potluck Contributions – Bring to gatherings knowing the chocolate-peanut butter combo appeals universally.
Game Day Snacks – Serve during sports events where the rich, satisfying flavor provides energy and enjoyment.
Bake Sales – The impressive marbled appearance and beloved flavor combination ensure quick sales.
Storage & Serving Tips
Room Temperature Storage – Keep in an airtight container at room temperature for up to 5 days.
Refrigerator Option – Refrigerate for firmer, fudgier texture, bringing to room temperature before serving for best flavor.
Freezing Instructions – Freeze individually wrapped brownies for up to 3 months, thawing at room temperature.
Serving Temperature – These taste delicious cold, at room temperature, or slightly warm for different textural experiences.
Creative Variations to Try
Reese’s Pieces Addition – Fold ½ cup Reese’s Pieces candies into the batter for extra peanut butter flavor and color.
Peanut Butter Frosting – Top cooled brownies with peanut butter frosting for even more intense peanut flavor.
Salted Peanuts – Sprinkle chopped salted peanuts on top before baking for crunchy, salty contrast.
White Chocolate Chips – Use white chocolate chips instead of semi-sweet for sweeter, creamier chocolate element.
Troubleshooting Common Issues
Peanut butter sinking – Ensure the batter is thick enough to support swirls; if too thin, refrigerate batter briefly before swirling.
Brownies too dry – Reduce baking time and remove when center still appears underdone, as carryover heat continues cooking.
Difficult to swirl – Warm the reserved peanut butter slightly if it’s too thick to drizzle and swirl easily.
Uneven baking – Spread batter evenly in pan and rotate halfway through baking for uniform results.
Why This Recipe Works
Peanut Butter Brownies succeed through careful balance of chocolate and peanut butter that allows both flavors to shine without one overwhelming the other. Incorporating peanut butter into the batter ensures every bite has nutty flavor, while the swirled topping creates visual appeal and concentrated peanut butter pockets. Using both granulated and brown sugar creates complex sweetness with caramel notes that enhance both chocolate and peanut butter. The relatively low flour content compared to sugar and fat creates fudgy texture rather than cake-like consistency. Chocolate chips throughout reinforce chocolate presence against the assertive peanut butter. At 280-320 calories per brownie, these are certainly indulgent treats best enjoyed occasionally as special desserts when you want maximum satisfaction.
Final Thoughts
Peanut Butter Brownies demonstrate that some flavor combinations are classics for good reason—they simply work beautifully together. The marbled appearance adds visual interest that makes these appropriate for special occasions despite simple preparation. These brownies prove that incorporating favorite candy flavors into baked goods creates familiar yet elevated results that satisfy on multiple levels. While rich and decadent, the protein from peanut butter makes these slightly more substantial than pure chocolate brownies, creating treats that feel satisfying rather than empty calories.
Strawberry Brownies
Strawberry Brownies use strawberry cake mix to create quick, pink bars with intense strawberry flavor topped with sweet strawberry glaze. These simple, colorful treats require minimal ingredients and effort while delivering impressive results perfect for spring celebrations or anytime you crave fruity desserts.
Why You’ll Love This Recipe
Ultra-Simple – With just three ingredients for the base, these brownies come together faster than almost any other bar cookie.
Vibrant Pink Color – The beautiful pink hue makes these visually striking and perfect for celebrations, showers, or themed parties.
Intense Strawberry Flavor – The combination of cake mix and strawberry extract creates bold, authentic strawberry taste.
Cake Mix Convenience – Using cake mix eliminates measuring multiple dry ingredients while ensuring consistent results every time.
Sweet Glaze – The strawberry-flavored glaze adds extra sweetness and intensifies the strawberry experience.
Perfect for Beginners – The foolproof nature makes these ideal for novice bakers or children learning to bake.
Ingredients You’ll Need
Brownie Base:
½ cup salted butter, melted – adds richness and creates dense, brownie-like texture
2 large eggs plus 1 egg yolk, room temperature – provides structure and creates chewy consistency
1 box strawberry cake mix – delivers strawberry flavor, structure, and pink color
Strawberry Glaze:
1 cup powdered sugar – sweetens and creates proper glaze consistency
1 teaspoon strawberry extract – reinforces strawberry flavor in the topping
1-2 tablespoons water – thins glaze to pourable consistency
Step-by-Step Instructions
Prepare Pan and Mix Base
Preheat oven to 350°F (175°C) and line an 8×8-inch or 9×9-inch pan with parchment paper. In a large bowl, mix melted butter, eggs, egg yolk, and cake mix until just combined and no dry spots remain.
Bake
Spread batter evenly in prepared pan and bake for 20-25 minutes until edges are set and center appears slightly underdone.
Make Glaze
While brownies bake, whisk together powdered sugar, strawberry extract, and enough water to create smooth, pourable glaze.
Glaze Brownies
Allow brownies to cool for 10 minutes, then pour glaze evenly over the warm brownies, spreading to edges with a spatula.
Cool and Cut
Let brownies cool completely to allow glaze to set before cutting into 16 squares with a sharp knife.
Recipe Notes & Tips
Cake Mix Brand – Different brands vary slightly; if batter seems too thick, add 1 tablespoon water.
Room Temperature Eggs – Bring eggs to room temperature for easier mixing and more uniform texture.
Extra Egg Yolk – The additional yolk creates richer, denser texture than using whole eggs alone would provide.
Glaze Consistency – Add water gradually until glaze is thin enough to spread but thick enough to stay on surface.
Cooling Before Glazing – Let brownies cool slightly before glazing to prevent glaze from melting and running off completely.
Storage Instructions – Store covered at room temperature for up to 4 days.
Nutritional Information
Prep Time: 10 minutes
Bake Time: 20-25 minutes
Total Time: 30-35 minutes (plus cooling)
Yield: 16 brownies
Calories: Approximately 160-180 calories per brownie
Perfect Pairings
Fresh Strawberries – Serve with fresh sliced strawberries that reinforce the flavor and add fresh, juicy contrast.
Whipped Cream – Top with whipped cream for richness that balances the sweet strawberry.
Vanilla Ice Cream – Pair with vanilla ice cream for a strawberries-and-cream inspired dessert.
Lemonade – Enjoy with cold lemonade where tart citrus complements sweet strawberry perfectly.
Ideal Occasions
Valentine’s Day – The pink color makes these perfect for romantic celebrations or classroom parties.
Baby Showers – Serve at baby girl showers where the pink color matches celebration themes.
Spring Gatherings – Bring to Easter, Mother’s Day, or spring parties where fruity flavor feels seasonal.
Kids’ Parties – Children love the sweet strawberry flavor and pretty pink color.
Storage & Serving Tips
Room Temperature Storage – Keep covered at room temperature for up to 4 days.
Refrigerator Option – Refrigerate for longer storage up to 1 week, though texture firms up when cold.
Freezing Instructions – Freeze unglazed brownies wrapped tightly for up to 3 months, thawing and glazing before serving.
Clean Cutting – Wipe knife between cuts for neat edges through the glazed top.
Creative Variations to Try
White Chocolate Chips – Fold ½ cup white chocolate chips into the batter for added sweetness and texture.
Cream Cheese Frosting – Replace strawberry glaze with cream cheese frosting for richer, tangier topping.
Strawberry Crumble – Top with crushed Golden Oreos mixed with strawberry gelatin for crunchy contrast.
Fresh Strawberry Addition – Fold ½ cup diced fresh strawberries into the batter for fruit pockets throughout.
Troubleshooting Common Issues
Brownies too dry – Reduce baking time by 2-3 minutes, as cake mix brownies overbake easily.
Glaze too thin – Add more powdered sugar gradually until proper consistency is achieved.
Glaze not setting – Allow more cooling time, or refrigerate briefly to help glaze firm up.
Color too pale – Use additional food coloring in glaze if desired for more vibrant pink.
Why This Recipe Works
Strawberry Brownies succeed through the simplified chemistry of cake mix combined with reduced liquid that creates denser texture. Using melted butter instead of oil adds richness while the extra egg yolk contributes fat and emulsifiers that create tender crumb. Omitting additional liquid beyond eggs makes the texture more brownie-like than the cakey results the mix would normally produce. The strawberry extract in the glaze reinforces flavor from the cake mix, ensuring strawberry taste comes through clearly rather than tasting generic or artificial. At 160-180 calories per brownie, these provide reasonable treat portions that satisfy sweet cravings without excessive calories.
Final Thoughts
Strawberry Brownies prove that impressive results don’t always require complicated recipes or extensive ingredient lists. The cake mix shortcut makes these accessible for busy bakers or those lacking confidence with from-scratch baking. While certainly simpler than many brownie variations, these bars deliver genuine strawberry flavor and attractive appearance that makes them valuable for celebrations and gifting. These brownies demonstrate that sometimes the easiest recipes are the ones you’ll make most often, creating treats that bring joy without stress.
Apple Brownies with Maple Glaze
Apple Brownies feature diced Honeycrisp apples and warm cinnamon in tender bars topped with maple glaze that tastes like autumn in every bite. These unique brownies trade chocolate for apple-cinnamon comfort, creating something entirely different that celebrates fall flavors beautifully.
Why You’ll Love This Recipe
Fall Flavor Profile – Apples, cinnamon, and maple create quintessential autumn taste that captures the season perfectly.
Fresh Fruit Addition – Diced apples throughout add moisture, texture, and fresh flavor that makes these feel wholesome.
Maple Glaze – The maple topping reinforces autumn themes while adding sweetness and visual appeal.
Unique Alternative – These brownies offer something completely different from chocolate or fruit-flavored varieties.
Comforting Spices – Cinnamon and maple extract create warm, cozy flavors perfect for cool weather.
Impressive Presentation – The glazed top and visible apple pieces create rustic, homemade appeal.
Ingredients You’ll Need
Apple Component:
2½ cups Honeycrisp apples, peeled and diced into ½-¾ inch pieces – provides fresh fruit flavor and moisture
¼ cup granulate sugar – sweetens apples and draws out moisture
½ teaspoon ground cinnamon – adds warm spice that complements apples
Brownie Batter:
2¼ cups all-purpose flour – creates structure for the tender bars
1 teaspoon baking powder – provides lift for cake-like texture
½ teaspoon cinnamon – reinforces warm spice throughout
½ teaspoon salt – enhances flavors and balances sweetness
1½ cups light brown sugar – adds caramel notes and moisture
1 cup unsalted butter, melted – creates richness and tender texture
1 teaspoon vanilla extract – enhances overall flavor
½ teaspoon maple extract – introduces maple flavor that glaze reinforces
2 large eggs, room temperature – binds ingredients and provides structure
Maple Glaze:
3 tablespoons unsalted butter, melted and cooled – adds richness to glaze
⅓ cup pure maple syrup – provides authentic maple flavor
½ teaspoon maple extract – intensifies maple taste
⅛ teaspoon cinnamon – adds warm spice note
⅛ teaspoon salt – balances sweetness
1½ cups powdered sugar – sweetens and creates proper glaze consistency
Step-by-Step Instructions
Prepare Apples
Peel and dice Honeycrisp apples into ½-¾ inch pieces. Toss with ¼ cup sugar and ½ teaspoon cinnamon, then set aside while preparing batter.
Mix Dry Ingredients
Preheat oven to 350°F (175°C) and line a 9×13-inch pan with parchment. Whisk together flour, baking powder, cinnamon, and salt.
Combine Wet Ingredients
In a large bowl, whisk brown sugar with melted butter until smooth, then beat in vanilla extract, maple extract, and eggs until combined.
Complete Batter
Fold dry ingredients into wet ingredients just until combined, then gently fold in the apple mixture with any accumulated juices.
Bake
Spread batter evenly in prepared pan and bake for 28-32 minutes until edges are golden and center is set.
Make Glaze
While brownies bake, whisk together melted cooled butter, maple syrup, maple extract, cinnamon, salt, and powdered sugar until smooth.
Glaze and Serve
Allow brownies to cool for 15 minutes, then pour glaze evenly over warm brownies, spreading to edges. Let cool completely before cutting into 24 bars.
Recipe Notes & Tips
Apple Variety – Honeycrisp works best for their sweet-tart balance and crisp texture that holds up during baking.
Uniform Dicing – Cut apples into similar-sized pieces for even distribution and consistent texture.
Don’t Skip Apple Prep – Tossing apples with sugar and cinnamon draws out moisture and seasons them perfectly.
Pure Maple Syrup – Use real maple syrup rather than pancake syrup for authentic maple flavor in the glaze.
Glaze Temperature – Allow melted butter to cool before making glaze to prevent powdered sugar from dissolving too much.
Storage Method – Store covered at room temperature for up to 4 days, or refrigerate for up to 1 week.
Nutritional Information
Prep Time: 20 minutes
Bake Time: 28-32 minutes
Total Time: 50-55 minutes (plus cooling)
Yield: 24 brownies
Calories: Approximately 180-200 calories per brownie
Perfect Pairings
Hot Apple Cider – Serve with warm apple cider for a double-apple experience perfect for autumn.
Vanilla Ice Cream – Top warm brownies with vanilla ice cream for temperature contrast reminiscent of apple pie à la mode.
Hot Tea – Pair with chai or cinnamon tea where the spices complement the brownies’ warm flavors.
Caramel Sauce – Drizzle with caramel sauce for additional sweetness and autumn flavor.
Ideal Occasions
Thanksgiving Desserts – Serve at holiday gatherings as an alternative to traditional pies that’s easier to serve.
Fall Festivals – Bring to autumn celebrations, harvest parties, or Halloween events where seasonal flavors shine.
Potluck Contributions – Transport easily and serve at room temperature, making them ideal for casual gatherings.
Gift Boxes – Include in homemade gift assortments during autumn months when apples are at their peak.
Storage & Serving Tips
Room Temperature Storage – Keep covered at room temperature for up to 4 days in cool weather.
Refrigerator Storage – Store in the refrigerator for up to 1 week, bringing to room temperature before serving.
Freezing Instructions – Freeze unglazed brownies wrapped tightly for up to 3 months, thawing and glazing before serving.
Warming Option – Microwave individual brownies briefly to warm the apples and create fresh-baked experience.
Creative Variations to Try
Caramel Apple Brownies – Drizzle with caramel sauce along with or instead of maple glaze for richer flavor.
Walnut Addition – Fold ½ cup chopped walnuts into the batter for nutty crunch that complements apples.
Cream Cheese Frosting – Replace maple glaze with cream cheese frosting for tangier, richer topping.
Spiced Apple Brownies – Add ¼ teaspoon nutmeg and ⅛ teaspoon allspice to batter for more complex spice profile.
Troubleshooting Common Issues
Apples sinking – Toss apples with 1 tablespoon of the flour before folding into batter to help suspend them.
Brownies too wet – Ensure apples are well-drained before adding, or reduce apple quantity slightly.
Glaze too thick – Thin with additional maple syrup or milk, adding one teaspoon at a time.
Dry texture – Don’t overbake; remove when center just sets, as apples release moisture during baking.
Why This Recipe Works
Apple Brownies succeed by incorporating fresh fruit into bar cookie format while maintaining proper texture balance. Dicing apples into small pieces distributes them throughout while preventing excess moisture from creating soggy centers. Tossing apples with sugar draws out some juice that seasons the fruit while the remaining moisture keeps brownies tender. Brown sugar adds caramel notes that complement apples naturally while contributing moisture that prevents dryness. The combination of vanilla and maple extracts creates complex flavor without either dominating. Baking powder creates lift that accommodates the apple pieces without becoming too cake-like. The maple glaze reinforces autumn themes while adding visual appeal and extra sweetness. At 180-200 calories per brownie, these provide reasonable portions that feel more wholesome than chocolate versions due to fresh fruit inclusion.
Final Thoughts
Apple Brownies demonstrate that the brownie format adapts beautifully to seasonal flavors beyond chocolate or even traditional fruit bars. The combination of fresh apples, warm spices, and maple creates something that tastes distinctly autumnal while maintaining the convenience of bar cookies. These brownies prove that thinking creatively about flavor profiles leads to unique desserts that celebrate ingredients beyond the expected. While different from traditional brownies, these apple-maple bars deliver their own kind of satisfaction that makes them valuable additions to fall baking repertoires.
Final Thoughts on the Complete Brownie Collection
These eight brownie variations—Blondies, Lunch Lady, Strawberry Shortcake, Coconut, Lemon, Peanut Butter, Strawberry, and Apple—demonstrate the incredible versatility possible within the brownie format. From classic chocolate to unexpected apple-maple combinations, this collection ensures you’ll never run out of delicious options for cookie trays, potlucks, gift boxes, or cozy nights at home.
The variety spans different flavor profiles, textures, and complexity levels, ensuring options for every occasion, skill level, and taste preference. Whether you crave the nostalgic comfort of Lunch Lady brownies, the tropical appeal of coconut layers, the bright freshness of lemon, or the seasonal charm of apple-maple, this collection provides reliable recipes that consistently deliver delicious results.
What unites these diverse brownies is their shared convenience as bar cookies—simple to prepare, easy to transport, and straightforward to serve without plates or forks. This practicality combined with impressive flavors makes brownies valuable for everything from casual family treats to elegant gift-giving.
So which flavor is calling your name? Whether you choose classic chocolate-peanut butter, refreshing strawberry, sophisticated coconut layers, or comforting apple-cinnamon, these brownie recipes promise to deliver happiness in every square, proving that sometimes the best desserts are those you can share easily while creating sweet memories with the people you love.