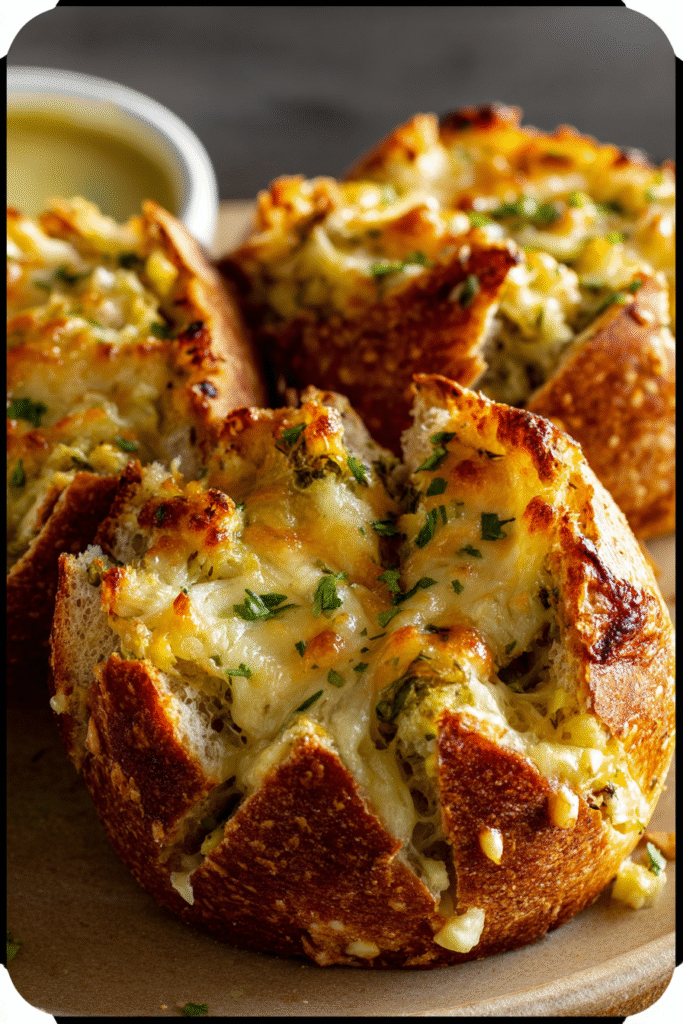
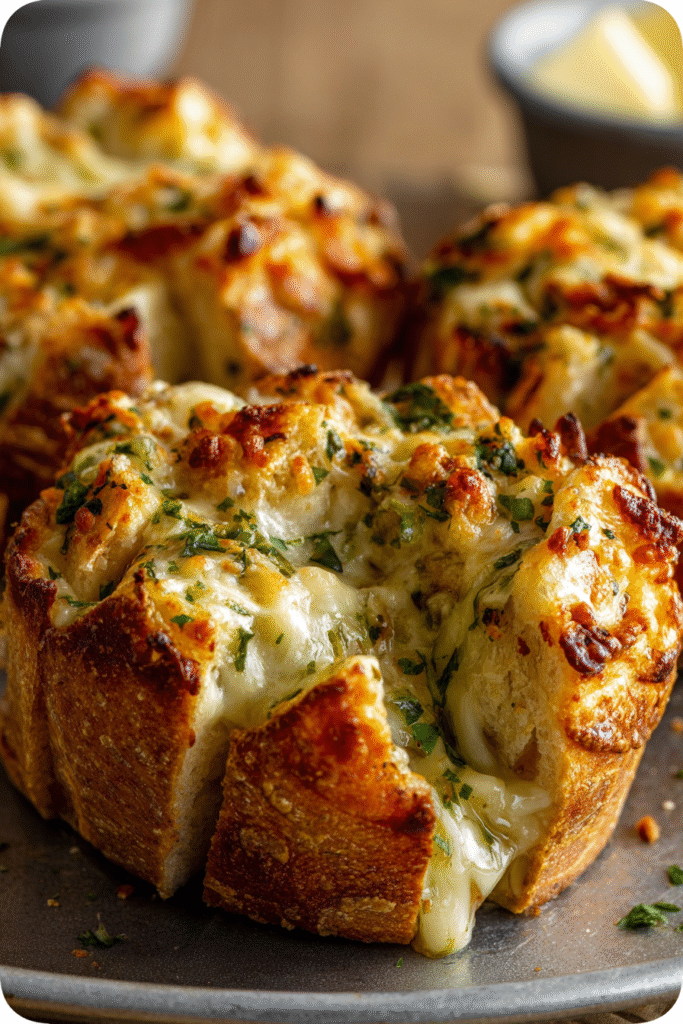
This stunning pull-apart bread combines fluffy, layered dough with roasted green chiles, melted cheese, and rich garlic butter for an interactive dining experience that’s as fun to pull apart as it is to eat. The technique of stacking buttered, cheese-filled dough pieces creates dramatic layers that separate beautifully when baked, revealing pockets of gooey cheese and smoky chile flavor. The result is a golden, pull-apart masterpiece with crispy edges, soft interior layers, and an irresistible garlic butter finish that makes every piece a perfect bite.
Why You’ll Love This Recipe
- Interactive Dining Experience – The pull-apart design allows everyone to tear off their own perfectly portioned piece, making it ideal for sharing and creating a fun, communal eating experience at any gathering.
- Customizable Heat Level – Control the spice intensity by choosing mild or hot green chiles, or mix varieties to create your perfect balance of smoky flavor and heat that suits your taste preferences.
- Impressive Presentation – The dramatic layered structure and golden-brown finish create a bakery-worthy appearance that looks far more complicated than it actually is to prepare.
- Minimal Hands-On Time – Using store-bought dough eliminates the need for yeast proofing and kneading, allowing you to create an impressive bread in under an hour from start to finish.
- Perfect Cheese Distribution – Unlike traditional stuffed breads where cheese pools at the bottom, the stacking method ensures every layer contains melted cheese for consistent flavor throughout.
- Make-Ahead Friendly – Assemble the loaves in advance and refrigerate before baking, making this an excellent option for entertaining without last-minute stress.
Ingredients You’ll Need
Base Dough
- 1 lb pizza dough or refrigerated biscuit dough – Provides the fluffy, bread-like structure that separates into pull-apart layers when baked
- ¼ tsp salt – Enhances all the flavors and balances the richness of the butter and cheese
Filling Components
- 1 cup shredded Monterey Jack or cheddar cheese – Creates gooey, melted pockets between layers; Monterey Jack offers mild creaminess while cheddar provides sharper flavor
- ½ cup roasted green chiles, chopped – Adds smoky, slightly tangy flavor with mild to moderate heat depending on variety chosen
Garlic Butter Mixture
- 4 tbsp butter, melted – Provides rich flavor, helps layers separate during baking, and creates a golden-brown finish
- 2 cloves garlic, minced – Infuses the butter with aromatic, savory flavor that complements the cheese and chiles
- 1 tbsp chopped parsley – Adds fresh, herbaceous notes and visual appeal with bright green flecks
Step-by-Step Instructions
Prepare Your Oven and Pan Preheat your oven to 375°F (190°C) and generously grease three mini loaf pans (approximately 5×3 inches each) or one standard 9×5-inch loaf pan with butter or non-stick spray. Proper greasing ensures easy removal after baking and prevents sticking on the crispy edges.
Create the Garlic Butter In a small bowl, combine the melted butter with minced garlic, chopped parsley, and salt, stirring until well incorporated. Set aside a tablespoon or two of this mixture for brushing on the finished loaves after baking.
Cut the Dough Roll out your pizza dough on a lightly floured surface to about ¼-inch thickness, then cut it into small squares or rectangles approximately 2-3 inches in size. The exact shape doesn’t need to be perfect, as the rustic, irregular pieces create character in the final presentation.
Layer with Butter, Cheese, and Chiles Brush one side of each dough piece generously with the garlic butter mixture, then sprinkle with shredded cheese and a small amount of chopped green chiles. Work in batches to keep the assembly organized and prevent the butter from soaking in too much before stacking.
Stack in the Pan Loosely stack the prepared dough pieces vertically in your greased pan, standing them on edge like a deck of cards tilted at an angle. Avoid packing too tightly, as the dough needs room to expand and create those beautiful pull-apart layers during baking.
Add Finishing Touches Sprinkle extra shredded cheese and additional chopped green chiles over the top of the stacked dough for a beautifully golden, cheese-crusted finish. This top layer caramelizes during baking and adds textural contrast.
Bake to Golden Perfection Place the pan(s) in your preheated oven and bake for 25-30 minutes, or until the bread is puffed, deeply golden brown, and the internal temperature reaches at least 190°F. The layers should appear separated with visible gaps between pieces.
Apply Final Butter Glaze Immediately after removing from the oven, brush the hot loaves with the reserved garlic butter to add extra flavor and create a glossy, appetizing finish. Allow to cool for 5 minutes in the pan before serving warm.
Recipe Notes & Tips
- Dough Temperature Matters – Let refrigerated dough sit at room temperature for 15-20 minutes before rolling to prevent tearing and make it easier to work with during the cutting and stacking process.
- Don’t Overstuff – While it’s tempting to add extra cheese and chiles, too much filling prevents the layers from adhering properly and can cause the loaves to fall apart when pulled.
- Pan Selection Impact – Mini loaf pans create more surface area for crispy edges and allow each guest to have their own individual loaf, while a larger pan produces taller, more dramatic layers.
- Butter Brushing Technique – Use a pastry brush to apply butter generously but not so heavily that it pools at the bottom of the pan, which can make the bottom layer greasy rather than crispy.
- Even Baking – If making multiple mini loaves, space them evenly on the baking sheet with at least 2 inches between pans to ensure proper air circulation and uniform browning.
- Cream Cheese Addition – For an ultra-rich variation, place small dollops of softened cream cheese between every 3-4 layers to create pockets of tangy, molten cheese throughout the loaf.
Nutritional Information
Prep Time: 20 minutes
Cooking Time: 25-30 minutes
Total Time: 45-50 minutes
Servings: 3 mini loaves or 1 large loaf (serves 6-8 as a side dish)
Calories: Approximately 280-320 per serving (based on 8 servings), varying with dough type and cheese quantity
Perfect Pairings
- Southwestern Soups and Stews – Serve alongside tortilla soup, green chile chicken stew, or pozole to soak up flavorful broths and complement the Southwestern flavor profile.
- Grilled Meats – Pairs beautifully with carne asada, grilled chicken, or barbecue ribs as a unique alternative to traditional dinner rolls or cornbread.
- Fresh Salads – Balance the richness with a crisp romaine salad dressed with lime vinaigrette, or a tangy jicama and citrus slaw for textural contrast.
- Game Day Spreads – Include as part of an appetizer spread with guacamole, salsa, queso dip, and other finger foods for casual entertaining.
Ideal Occasions
- Casual Dinner Parties – The impressive presentation and interactive eating style make this an excellent conversation starter and crowd-pleaser for informal gatherings.
- Holiday Gatherings – Offer a unique alternative to traditional dinner rolls at Thanksgiving or Christmas dinners, especially for guests who enjoy Southwestern flavors.
- Game Day Celebrations – The pull-apart format is perfect for sharing during sports viewing parties, requiring no utensils and minimal cleanup.
- Potluck Contributions – Transport easily in the baking pan covered with foil, and the communal nature makes it ideal for events where guests serve themselves buffet-style.
Storage & Serving Tips
- Immediate Serving – For best texture and cheese consistency, serve within 15 minutes of baking while the bread is still warm and the cheese is optimally melty and stretchy.
- Short-Term Storage – Wrap cooled loaves tightly in aluminum foil and store at room temperature for up to 2 days, reheating in a 325°F oven for 10-12 minutes before serving.
- Freezing Instructions – Freeze assembled but unbaked loaves tightly wrapped in plastic wrap then foil for up to 1 month; bake directly from frozen, adding 10-15 minutes to the cooking time.
- Reheating Method – Avoid microwaving, which makes the bread tough and rubbery; instead, reheat in a 300°F oven wrapped loosely in foil to restore softness while crisping the exterior.
Creative Variations to Try
- Italian-Inspired Version – Replace green chiles with sun-dried tomatoes and use mozzarella and Parmesan cheese, finishing with Italian herbs like oregano and basil in the butter.
- Bacon Jalapeño Twist – Add crispy, crumbled bacon between layers along with pickled jalapeños and pepper jack cheese for a spicier, smokier variation.
- Breakfast Version – Use cheddar and scrambled egg pieces with the green chiles, and add crumbled breakfast sausage for a morning-friendly pull-apart bread.
- Vegan Adaptation – Substitute plant-based butter and dairy-free cheese alternatives, ensuring your dough is also vegan-friendly, for an inclusive option that maintains the layered texture.
Troubleshooting Common Issues
- Layers Not Separating – The dough pieces were likely packed too tightly in the pan; ensure loose stacking with visible gaps to allow expansion during baking.
- Soggy Bottom – Excess butter pooled at the bottom; reduce the amount brushed on each piece and ensure your pan is properly preheated on the oven rack.
- Cheese Leaking Out – Too much cheese or pieces placed too close to pan edges; keep filling slightly away from edges and use cheese more sparingly per layer.
- Dough Not Fully Cooked – The center remains raw while edges brown; tent with foil after 20 minutes to prevent over-browning while allowing the interior to finish baking.
Why This Recipe Works
The success of this pull-apart bread lies in the stacking technique, which creates natural separation points between each dough layer while maintaining structural integrity. When dough pieces are stacked vertically with butter between them, the fat prevents gluten strands from bonding completely, allowing steam to create distinct layers during baking. The butter also promotes browning through the Maillard reaction, creating that desirable golden crust. The cheese acts as both flavor and structural element—as it melts, it creates pockets of gooey richness while also helping adjacent dough pieces adhere just enough to hold the loaf together. The green chiles add moisture and acidity, which tenderizes the dough and balances the richness of the butter and cheese. At approximately 280-320 calories per serving, this bread is moderately indulgent, with the majority of calories coming from the carbohydrate-rich dough and fat from butter and cheese.
Final Thoughts
This Green Chile Cheese & Garlic Butter Pull-Apart Bread transforms simple store-bought dough into a restaurant-quality bread that combines visual appeal with incredible flavor and texture. The technique is easily mastered even by novice bakers, yet the impressive layered result suggests hours of skilled work. The customizable nature means you can adjust heat levels, cheese varieties, and add-ins to suit any preference or dietary need, making it a versatile addition to your recipe collection. While this is an indulgent side dish, you can lighten it slightly by using reduced-fat cheese, less butter (brush more sparingly), or whole wheat pizza dough for added fiber. The pull-apart format encourages portion awareness—each pulled section is a reasonable serving—making it easier to enjoy this flavorful bread mindfully as part of a balanced meal.