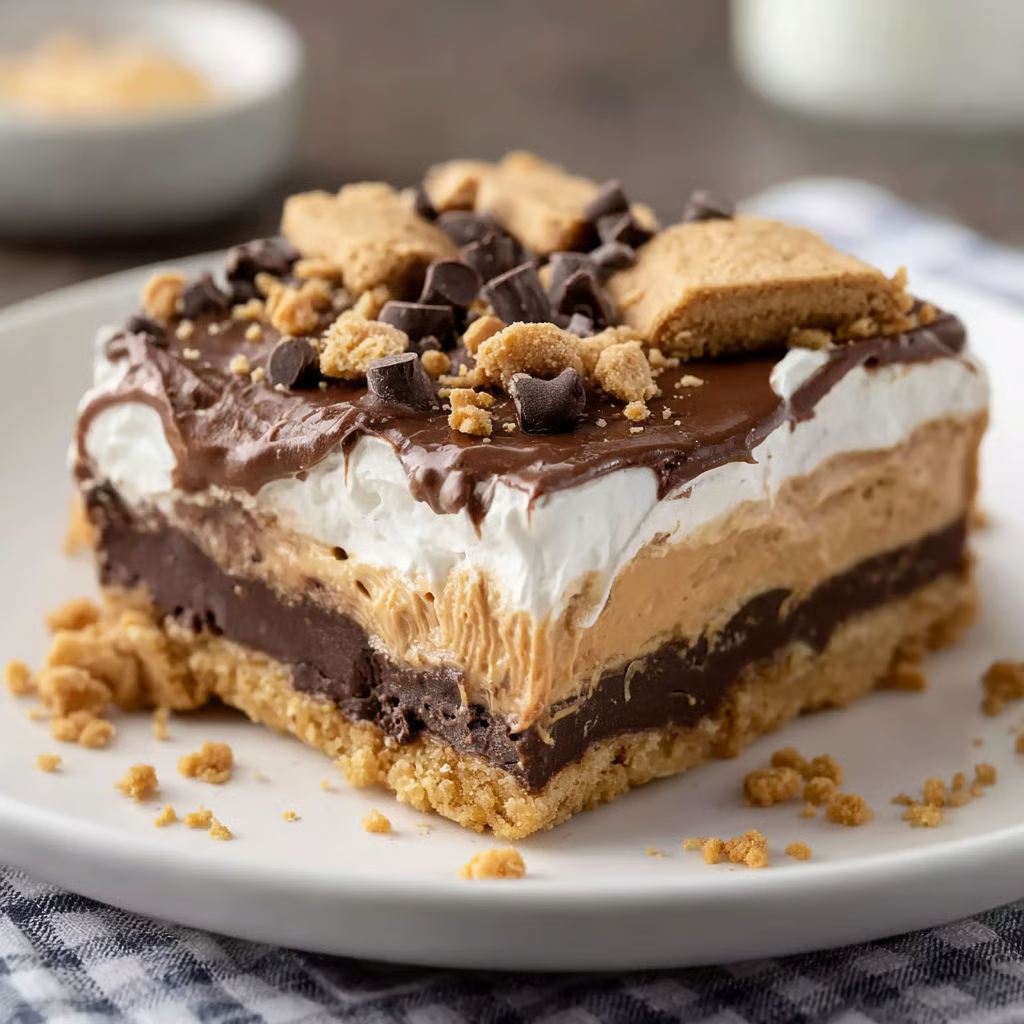

This show-stopping no-bake layered dessert transforms the concept of traditional lasagna into a sweet celebration featuring a chocolate cookie crust, velvety cream cheese filling, dual pudding layers, and festive holiday decorations. The technique involves building distinct layers that set separately in the refrigerator, creating beautiful visual stripes when sliced while delivering contrasting textures and complementary flavors in every bite. The result is a crowd-pleasing dessert that requires no oven time, feeds a large group, and can be prepared entirely in advance, making it the ultimate stress-free holiday entertaining solution.
Why You’ll Love This Recipe
No-Bake Convenience – This dessert requires absolutely zero oven time, freeing up valuable oven space during busy holiday cooking and eliminating concerns about overbaking or temperature precision.
Make-Ahead Masterpiece – Best prepared the day before serving, this dessert actually improves as it chills, allowing flavors to meld and layers to set perfectly while removing last-minute preparation stress from your holiday schedule.
Feeds a Crowd Easily – Yielding 16 generous servings from a single 9×13-inch pan, this dessert efficiently serves large gatherings without requiring multiple batches or complicated portioning.
Visually Stunning Presentation – The distinct layers create dramatic visual appeal when sliced, with contrasting colors and textures that immediately signal “special occasion” without requiring advanced decorating skills.
Customizable for Any Holiday – While perfect for Christmas with red and green decorations, the base recipe adapts effortlessly to any celebration by simply changing the sprinkles and candy garnishes to match your theme.
Kid-Friendly Appeal with Adult Sophistication – The familiar flavors of Oreos, pudding, and whipped cream appeal to children, while the layered presentation and balanced sweetness satisfy adult palates without being cloying.
Ingredients You’ll Need
For the Oreo Crust
36 Oreo cookies, crushed – Creates a rich, chocolate cookie base with the signature Oreo flavor; crushing them finely ensures the crust holds together and provides the proper foundation texture (approximately 3 cups when crushed).
1/2 cup (113g) unsalted butter, melted – Binds the cookie crumbs together into a cohesive crust that slices cleanly; melted butter distributes evenly throughout the crumbs for consistent texture.
For the Cream Cheese Layer
8 oz (226g) cream cheese, softened to room temperature – Provides the tangy, rich base for the first creamy layer; room temperature is crucial for achieving smooth, lump-free consistency.
1/4 cup (50g) granulated sugar – Sweetens the cream cheese layer while balancing the tanginess; granulated sugar dissolves completely when beaten properly.
2 tablespoons whole milk – Loosens the cream cheese mixture slightly for easier spreading and helps achieve a lighter, more spreadable consistency.
1 teaspoon vanilla extract – Adds warm, aromatic complexity that enhances the cream cheese flavor and ties together the various sweet components.
1 1/2 cups whipped topping – Lightens the dense cream cheese mixture, creating an airy, mousse-like texture that contrasts beautifully with the firm crust below; thawed if using frozen.
For the Pudding Layers
1 box (3.4 oz/96g) instant vanilla pudding mix – Creates the light-colored top pudding layer with classic vanilla flavor that provides contrast to the chocolate layer.
1 box (3.4 oz/96g) instant chocolate pudding mix – Forms the rich, dark middle pudding layer that adds visual drama and chocolate intensity to complement the Oreo crust.
3 cups (720ml) cold milk, divided – Activates the instant pudding mixes and determines the final consistency; using cold milk helps the pudding set properly (1 1/2 cups per pudding flavor).
For the Topping and Decoration
1 1/2 cups whipped topping – Creates the smooth, white canvas on top that showcases the festive decorations and adds a final layer of creamy richness.
Christmas or holiday sprinkles – Provides festive color, texture, and immediate visual identification of the dessert’s celebratory purpose; use red, green, and white for traditional Christmas appeal.
Mini M&Ms or holiday candies – Adds pops of color, chocolatey crunch, and playful decoration that makes the dessert especially appealing to children and photography-worthy for social media.
Step-by-Step Instructions
Create the Oreo Crust Foundation
Place the Oreo cookies (filling included) in a food processor and pulse until they form fine, uniform crumbs, or place them in a sealed plastic bag and crush with a rolling pin until finely ground. Transfer the cookie crumbs to a large bowl, pour in the melted butter, and stir thoroughly with a fork or spatula until all crumbs are evenly moistened and the mixture resembles wet sand. Press the cookie mixture firmly and evenly into the bottom of a 9×13-inch baking pan, using the bottom of a measuring cup or glass to compact the crust and create a solid, even layer. Place the pan in the refrigerator to chill for at least 15 minutes while preparing the next layer—this helps the crust firm up and makes it less likely to mix with the cream cheese layer.
Prepare the Cream Cheese Layer
In a large bowl, beat the softened cream cheese with an electric mixer on medium speed for 1-2 minutes until completely smooth and fluffy with no lumps remaining. Add the granulated sugar, milk, and vanilla extract, and continue beating for another 1-2 minutes until the mixture is light, airy, and uniformly combined. Using a rubber spatula, gently fold in the 1 1/2 cups of whipped topping, using a folding motion rather than stirring to maintain the airiness, until the mixture is uniformly light in color and texture. Remove the pan from the refrigerator and spread the cream cheese mixture evenly over the chilled Oreo crust, using an offset spatula to create a smooth, level surface. Return the pan to the refrigerator while preparing the pudding layers.
Mix and Layer the Chocolate Pudding
In a medium bowl, whisk together the instant chocolate pudding mix with 1 1/2 cups of cold milk for about 2 minutes until the mixture thickens noticeably and no dry powder remains visible. Allow the pudding to stand for 3-5 minutes to set to a spreadable but not firm consistency—it should hold soft peaks when lifted with a spoon. Remove the pan from the refrigerator and carefully spread the chocolate pudding over the cream cheese layer, working gently from the center outward to avoid disturbing the layer beneath. Use a spatula to smooth the pudding into an even layer that reaches all corners of the pan.
Add the Vanilla Pudding Layer
In another medium bowl, whisk the instant vanilla pudding mix with the remaining 1 1/2 cups of cold milk for 2 minutes until thickened, then let it stand for 3-5 minutes to reach spreading consistency. Carefully spoon the vanilla pudding over the chocolate pudding layer, starting at the edges and working inward, then gently spread it into an even layer using a light touch to prevent the two pudding layers from mixing. Smooth the top surface completely to create an even canvas for the whipped topping.
Apply the Whipped Topping and Decorations
Spread the final 1 1/2 cups of whipped topping evenly over the vanilla pudding layer, creating smooth swirls or peaks as desired for visual interest. Immediately scatter the holiday sprinkles generously over the whipped topping, followed by strategically placed mini M&Ms or holiday candies in festive patterns—consider creating rows, random distribution, or even simple designs like Christmas trees or wreaths. Cover the pan loosely with plastic wrap, taking care not to let the wrap touch the decorated surface, and refrigerate for at least 4 hours or preferably overnight to allow all layers to set completely and flavors to meld.
Slice and Serve
When ready to serve, remove the dessert from the refrigerator and let it sit at room temperature for 5-10 minutes for easier slicing. Dip a large, sharp knife in hot water, wipe it dry with a towel, and make clean cuts to create 16 squares (4 cuts lengthwise and 3 cuts crosswise). Clean and reheat the knife between each cut for the cleanest presentation with distinct, beautiful layers visible on each slice.
Recipe Notes & Tips
Cookie Crushing Consistency Matters – Fine, uniform crumbs create a crust that holds together when sliced; large chunks will make the crust crumbly and difficult to cut cleanly, while powder-fine crumbs mixed with butter create an almost solid base.
Cream Cheese Temperature is Critical – Cold cream cheese will not blend smoothly and will create lumps that are nearly impossible to eliminate once the whipped topping is folded in; leave it at room temperature for 45-60 minutes before beginning.
Gentle Layering Prevents Mixing – When adding each new layer, start by placing small spoonfuls around the perimeter and in the center, then gently spread outward rather than pouring in one spot, which can create holes or break through to the layer below.
Pudding Timing Affects Spreadability – If the pudding sets too firmly before spreading, it becomes difficult to create even layers; work quickly after the 3-5 minute rest period, and if it becomes too thick, whisk in 1-2 tablespoons of additional milk.
Overnight Chilling Yields Best Results – While 4 hours is the minimum, overnight refrigeration allows the crust to absorb slight moisture from the layers above, creating a cohesive dessert that slices cleanly rather than separating into distinct components.
Transport and Storage Considerations – This dessert must remain refrigerated until serving; for transport to parties or potlucks, use a cooler with ice packs and keep it chilled until ready to serve to prevent the layers from softening or sliding.
Nutritional Information
Prep Time: 30 minutes (active preparation and layering time)
Cook Time: None (no-bake dessert)
Total Time: 30 minutes active + 4 hours minimum chilling (4 hours 30 minutes total, though overnight is recommended)
Servings: 16 squares from one 9×13-inch pan
Calories: Approximately 385 per serving (based on standard ingredients and equal division into 16 portions)
Perfect Pairings
Hot Coffee or Espresso – The rich, sweet layers pair beautifully with the bitter complexity of coffee, creating a classic dessert-and-coffee combination perfect for after-dinner service.
Cold Milk – Especially appealing to children and those who prefer traditional American dessert pairings, cold milk cuts through the richness and complements the Oreo crust.
Dessert Wine or Port – For adult gatherings, a sweet dessert wine or ruby port complements the chocolate layers while adding sophistication to the holiday dessert course.
Fresh Berries – Serving each square with a few fresh raspberries or strawberries on the side adds a tart, fresh element that balances the sweetness and provides visual color contrast.
Ideal Occasions
Christmas Gatherings and Holiday Parties – The festive appearance, make-ahead convenience, and crowd-friendly yield make this the ideal centerpiece dessert for Christmas Eve dinners, Christmas Day celebrations, or holiday open houses.
Potluck Contributions – The sturdy construction travels well when kept chilled, and the familiar flavors appeal to diverse palates, making this a guaranteed crowd-pleaser at office parties, church potlucks, or neighborhood gatherings.
New Year’s Celebrations – Simply swap the Christmas decorations for gold and silver sprinkles and black-and-white candies to create an elegant New Year’s Eve dessert with minimal effort.
Birthday Parties and Celebrations – The customizable decoration layer allows you to match any birthday theme or color scheme while feeding large groups without the formality of traditional birthday cake.
Storage & Serving Tips
Refrigerator Storage Duration – Store covered tightly with plastic wrap or in an airtight container in the refrigerator for up to 3 days; the dessert maintains its texture and flavor throughout this period, though the crust may soften slightly by day three.
Freezing Possibility with Caveats – While technically freezable for up to 1 month, the whipped topping may separate slightly upon thawing and the pudding layers can become slightly grainy; if freezing is necessary, freeze before adding the final whipped topping and decorations, then add fresh toppings after thawing.
Pre-Slicing Strategy for Events – For large gatherings, consider pre-slicing the dessert and using a thin spatula to transfer individual squares to a serving platter, making self-service easier and more elegant for guests.
Temperature Timing – Remove from the refrigerator no more than 10-15 minutes before serving; extended time at room temperature will cause the whipped topping to soften and potentially slide, and the pudding layers may become too soft to hold their shape when sliced.
Creative Variations to Try
Peanut Butter Chocolate Version – Use chocolate graham crackers for the crust, replace vanilla pudding with instant butterscotch or peanut butter pudding, and top with chopped peanut butter cups for a peanut butter cup–inspired variation.
Mint Chocolate Holiday Delight – Add 1/2 teaspoon mint extract to the cream cheese layer, use mint chocolate pudding instead of regular chocolate, and top with crushed candy canes or Andes mints for a refreshing peppermint twist.
Cookies and Cream Overload – Use cookies and cream pudding for both pudding layers, fold mini Oreo pieces into the cream cheese layer, and top with additional crushed Oreos for maximum cookie flavor.
Pumpkin Spice Fall Variation – Replace the Oreo crust with graham cracker crust, use vanilla and butterscotch pudding, add 1 teaspoon pumpkin pie spice to the cream cheese layer, and decorate with orange and brown sprinkles for a Thanksgiving-appropriate version.
Troubleshooting Common Issues
Layers are sliding or separating when sliced – The dessert wasn’t chilled long enough, or it sat at room temperature too long before serving; ensure a full 4-hour minimum chill time and keep refrigerated until moments before slicing.
Crust is too crumbly and falls apart – Insufficient butter or not pressing firmly enough created a loose crust; ensure all crumbs are evenly moistened with butter and use firm pressure with a flat-bottomed implement when pressing into the pan.
Cream cheese layer has lumps – The cream cheese was too cold when mixing; always bring cream cheese to room temperature (it should indent easily when pressed) and beat thoroughly before adding other ingredients.
Pudding layers are too runny or won’t set – Using warm milk or not whisking long enough prevents proper setting; always use cold milk and whisk vigorously for the full 2 minutes, then allow the standing time for thickening to occur.
Why This Recipe Works
The genius of Holiday Dessert Lasagna lies in its carefully engineered textural and flavor contrasts that create a complex eating experience from simple, accessible ingredients. The Oreo crust provides a firm, slightly crunchy foundation that prevents the creamy layers above from becoming monotonous while contributing intense chocolate flavor and a color contrast that makes the layers visually distinct. The cream cheese layer serves as a crucial bridge between the firm crust and soft pudding layers—its tangy richness prevents the dessert from becoming too sweet while its mousse-like texture (achieved by folding in whipped topping) provides a luxurious mouthfeel. The dual pudding layers create visual drama through color contrast while offering complementary chocolate and vanilla flavors that appeal to different preferences within the same dessert. Using instant pudding rather than cook-and-serve varieties allows the layers to set quickly without heat, maintaining the no-bake convenience while achieving proper firmness through the chemical reaction between the pudding mix and cold milk. The whipped topping serves double duty as both a textural component within the cream cheese layer (creating lightness) and as the final decorative canvas that remains stable under refrigeration. The make-ahead nature isn’t just convenient—it’s essential, as the resting time allows slight moisture migration between layers that helps them bond together while flavors meld and intensify. At approximately 385 calories per serving, this dessert is indulgent but provides a reasonable portion size that allows guests to enjoy other holiday foods without excessive guilt.
Final Thoughts
Holiday Dessert Lasagna represents the perfect intersection of nostalgic comfort food and impressive holiday entertaining, proving that spectacular results don’t require complicated techniques or professional pastry skills. The no-bake preparation removes barriers for nervous bakers while the layered construction creates a professional appearance that belies its simple assembly. The recipe’s genius lies not just in its ease but in its adaptability—the base formula remains constant while decorations, pudding flavors, and even crust variations allow you to customize for any celebration throughout the year. The make-ahead requirement transforms from a mere suggestion into a strategic advantage, allowing you to complete your dessert preparation while completely unstressed and giving you one less task on the actual day of your celebration. The crowd-friendly yield and universally appealing flavors mean you can confidently bring this to gatherings knowing it will satisfy both children who love the familiar Oreo and pudding flavors and adults who appreciate the balanced sweetness and elegant presentation. Whether you’re feeding family on Christmas Day, contributing to a holiday potluck, or hosting New Year’s Eve guests, this dessert delivers consistent, impressive results with minimal effort and maximum visual impact, making it destined to become a regular fixture in your holiday dessert rotation for years to come.